Category Archives: Cook

The baked feta and tomato pasta that broke the internet.

The baked feta and tomato pasta that broke the internet.

2020 might have had delgona coffee, banana bread and sourdough starters. But in 2021 this baked feta and tomato recipe by food blogger and artist Jenni Häyrine not only broke the internet, but supposedly caused a feta shortage in Finland! So naturally with nothing but socially distanced time on my hands I had to see for myself whether something so simple is really worth all the hoo-ha. And in short yes. Yes it is. It’s easy. It’s cheap. It’s meat free. And like a French toast omelette it is infinitely better than the sum of its parts.

The baked feta and tomato pasta that broke the internet

Just a few notes:

  • The original recipe calls for cocktail tomatoes. I couldn’t find at the only shop I could bother to go to that day, but they had some perfectly ripened, impossibly red beefsteak tomatoes so I just chopped those up.
  • I used traditional Greek style feta. This resulted in a caramelised, crumbly texture that was just gorgeous and still made for a creaminess to every bite. Danish feta would give you a creamier consistency overall.
  • The secret to success here (for my taste at least) is confiting the tomatoes till they’re gorgeously jammy. So don’t be scared to push your scarlet beauties to the edge of their endurance and don’t skimp on the olive oil!
  • The original recipe calls for 500g pasta, which I found a bit much for the tomatoes. I reduced it by 40%. Like with all good pastas, adding some of the cooking liquid to the sauce will bring the whole thing together, so remember that before you strain the lot!
  • You can add grated or chopped garlic to the recipe, but I love the subtle and sweet flavour that roasting whole cloves of garlic imparts.

Baked feta and tomato pasta

Hands-on time

5 mins

Cook time

40 mins

Total time

45 mins

Author: www.twosuitcasesandatinpot.com

Recipe type: Pasta, meat free

Serves: 3 to 4

Ingredients

  • 200g feta
  • 125ml olive oil
  • ½ red chilli (optional and to taste)
  • 500g tomatoes (cherry or beefsteak, cut into chunks)
  • 4 whole garlic cloves, skin on
  • freshly ground black pepper
  • salt to taste
  • bunch of freshly torn basil leaves
  • 300g pasta (I used cavatappi, but penne or fusili would work just as well)

Method

  1. Preheat your oven to 180˚C.
  2. Place feta, garlic cloves, chopped chilli and tomatoes in an ovenproof dish. Glug over the oil and season with black pepper.
  3. Bake for 30 minutes or until the tomatoes are gorgeously jammy. If your feta does not yet have a caramel hue, blast it under the grill for a couple of minutes.
  4. Get your pasta on the boil in some salted water and cook till al dente. (Reserve 125ml of the cooking liquid when straining.)
  5. Squeeze the garlic out of its skin. and smoosh a bit till it’s a paste. Break the feta up with a fork.
  6. Now combine the pasta, the whole baked tomato lot, the cooking liquid reserved from your pasta and torn fresh basil. Season to taste (wait till the end as the feta is almost salty enough) and enjoy!

Biscoff Rusks

Biscoff Rusks
Biscoff Rusks

A mere moon ago, when the world was an entirely different place, I tasted my first Biscoff biscuit on a long haul flight from the US. A flight which extended our personal lockdown to 7 weeks. Thank God I don’t mind not peopling (to put my social aversion mildly…). Biscoff biscuits are similar to Dutch speculoos biscuits, but not quite as in your face spicy and better in all the ways that Americans make food great again – more sugar and loads of butter. Or maybe that’s just Paula Dean…? Anyway, one of my very favourite small moments is that cup of tea and a biscuit at 4am (biological clock time) when everyone else on the plane is sleeping, and this one was a revelation! Because my very favourite small moment – probably in life – is my first cup of tea and rusk every morning. So I figured, hey! Speculoos style rusks should totally be a thing! The original rusk recipe is one that my Ouma Visser passed on to us and has been a staple in our house for decades. With a few tweaks and additions you are left with a tea time treat with less of the fat and sugar of Biscoff biscuits and all of the spice and warmth you require in these dark days. They are also super easy to make, requiring no rolling into balls, and are also egg free, so perfect for those poor souls with egg allergies! Which I hope all you egg challenge takers now have, cause siff. These rusks will fill your home with the most delicious, comforting aromas of butter, vanilla and spice as you gently let them dry in a low oven. So if your government won’t let you buy slippers and blankets to warm your tootsies, at least these rusks will warm your soul before you’ve even taken the first bite.

Biscoff Rusks

Hands-on time

20 mins

Cook time

300 mins

Total time

5 hours 20 mins

Author: www.twosuitcasesandatinpot.com

Serves: 100 pieces**

Ingredients

  • 4 cups flour
  • 4 cups Nutty Wheat*
  • 2 cups caramel sugar
  • 8 teaspoons baking powder
  • 2 teaspoons salt
  • 750ml buttermilk
  • 375g butter
  • 8 teaspoons cinnamon
  • 1 teaspoon nutmeg
  • 1 teaspoon ginger
  • 1 teaspoon allspice
  • 1 teaspoon vanilla

Method

  1. Preheat your oven to 180˚C.
  2. Sift the dry ingredients together in a large bowl.
  3. In a separate jug or bowl, melt the butter and stir in the buttermilk.
  4. Add your buttermilk mixture to your flour mixture and stir till combined.
  5. Pour the mixture into a large, greased baking tray. There are no hard and fast rules here. The smaller your dish, the taller your rusks will be, which is really no bad thing.
  6. Bake for one hour or until a skewer inserted into the center comes out clean.
  7. Allow to cool, turn out on a bread board and slice into your preferred size.
  8. Dry in a 100˚C oven (preferably with a fan) until bone dry. About four hours.

Notes

* You can substitute the Nutty Wheat with four parts flour and one part wheat bran, or just use flour.
** Yield depends on the size of your rusks.

Accidentally the best corn bread recipe

Accidentally the best corn bread recipe

Buy a restaurant, they said. It’ll be fun, they said. Four years down the line and I’ve aged a decade, haven’t had two consecutive nights of good sleep in 1562 days and have been relegated to those tier D friends who only get invited to shindigs when half the town has come down with the flu, but you have to throw that roast you accidentally defrosted one inebriated night while looking for boerie to cure the munchies on the Weber before it goes off. I haven’t written a blog post in more than two years and when I sit very, very still, I can almost hear my brain atrophying. I can’t even tell you who the new president of Zim is.

But writing isn’t the only thing that has taken a back seat along with my personal life and cranial development. Apparently the surest way to guarantee you never really get to cook is to do it for a living. This not unsurprising realisation hit me again last night when I found myself fending off fish moths while trying to find a tablecloth that doesn’t smell like old cupboard in order to deck my table for a Mexican dinner party. It’s been a while since I’ve entertained. Which is why I should be forgiven for forgetting that my all time favourite corn bread recipe calls for a tin of creamed sweetcorn. Up until this point I’d been wildly impressed with how my authentically-prepared-with-masa-harina tacos and made-from-scratch dulce de leche for my churros had turned out, so I should have realised that something was due to go pear shaped. I did, however, have some buttermilk on hand, so out of necessity my new favourite corn bread recipe was born. And while I don’t think this accident will change the world in the way, say, the discovery of penicillin or the origin of the potato chip will, I found it so good that I tossed away my old recipe (meaning I deleted it from Pinterest), which is a big deal in my corner of the universe. My version uses very little butter and sugar compared to the usual corn bread recipes, so you might want to up those quantities if you still own a hand stitched scatter pillow that says “I heart Paula Deen”.

the best corn bread recipe

Accidentally the best corn bread recipe

Hands-on time

5 mins

Cook time

60 mins

Total time

1 hour 5 mins

Author: www.twosuitcasesandatinpot.com

Recipe type: Breads and bakes

Cuisine: Southern

Serves: 10

Ingredients

  • 500ml buttermilk
  • kernels from two sweetcorn ears, cooked
  • 100ml butter, melted
  • 4 large eggs
  • 50ml white sugar
  • ½ cup grated cheddar cheese
  • 1 cup all purpose flour
  • 1 cup yellow polenta (Saffies, feel free to use mieliemeel, although the texture will be finer)
  • 20ml baking power
  • 3ml salt

Method

  1. Preheat the oven to 150˚C.
  2. Spray a 20cm loaf tin with non stick spray (or use two tins for smaller loaves).
  3. In a mixing bowl, pulse the corn and buttermilk together with a stick blender. You want the corn broken up, but not liquidized, kinda like creamed corn. (See what I did there?)
  4. Whisk in the butter and eggs.
  5. Stir in the sugar and cheese.
  6. Sift the remaining ingredients in and then whisk the whole lot together.
  7. Pour into loaf tins and bake for 45 minutes if doing two flatter loaves, or an hour if doing one loaf.
  8. Serve simply with lashings of butter and some grated cheese. Also really yummy with chilli con carne!

Smoorsnoek samoosas

Smoorsnoek samoosas

With Oscar’s story seemingly having more holes than a good Emmentaler, and a president whose chickens live in better quarters than the average South African, we are about ready for an icon we can look up to. There aren’t many contenders. Frankly, a dim witted fish would do the job at this point. Take snoek for example. Proudly South African and comfortably located on SASSI’s green list so you can tuck in guilt free without worrying about the state of our oceans, snoek is wonderful smoked and mashed up with a bit of mayo as a pâté, or braaied over the coals basted with lemon and apricot jam. Now that I own a restaurant, my culinary adventurism has taken a turn towards the more sensible. Gone are the days of trying out distinctly un-Hestonesque teqhniques on my friends (who fortunately claim they come to visit me for me and not my disastrous gloopy caramelised white chocolate spheres or exploded truffle croquettes). Now it’s all about creating fool proof dishes that can be prepared in advance and finished off with minimum hassle and in as short a time as possible, and these little morsels fit the bill perfectly. I’m quite proud of the fact that I can give someone fairly good directions when asked how to get to the nearest supermarket without getting them horribly lost or sounding like a total chick, but it will really be a lot easier at this point to ask you to just google how to fold samoosas if you don’t know how to do so. Somewhere, someone with a video camera and a mild case of gastronomic exhibitionism has no doubt captured the whole process on film for your reference. Failing that, they’d work perfectly rolled into springrolls too. If you can’t get smoked snoek, smoked mackerel would work just as well.

Smoorsnoek samoosas

Smoorsnoek samoosas

Hands-on time

50 mins

Cook time

20 mins

Total time

1 hour 10 mins

Author: www.twosuitcasesandatinpot.com

Recipe type: Snacks & starters

Cuisine: Cape Malay

Serves: makes about 40

Ingredients

  • 500g smoked snoek, deboned (good luck with that) and flaked
  • 1 medium onion, diced
  • 200g tinned whole tomatoes (about half a tin with the juice), chopped
  • 1 clove garlic, crushed
  • 3ml cumin
  • 3ml coriander
  • 10ml masala
  • 10ml vegetable oil
  • 500g phyllo pastry, each sheet cut into 10cm strips (or to whatever size samoosa you want)
  • 1 egg, beaten
  • 1L cooking oil
  • sweet chilli sauce to serve

Method

  1. In a pan or skillet, heat the vegetable oil over medium heat. Add the onions and saute till lightly golden.
  2. Add the garlic and spices and saute for a further 5 minutes.
  3. Add the snoek and tomatoes, turn down the heat and cook for ten minutes or so, stirring occasionally until the liquid from the tomatoes has evaporated. Cool (not cool as in awesome, cool as in let it get colder.)
  4. Brush the edges of a pastry strip with egg wash. Place a tablespoon of snoek mixture on the end and fold the samoosa into a neat little package.
  5. Heat the cooking oil to 200˚C and deep fry the samoosas in batches till golden brown. Serve with sweet chilli sauce.

Cream cheese & herb stuffed chicken with braised leeks & bacon

Cream cheese & herb stuffed chicken with braised leeks & bacon
Cream cheese stuffed chicken with bacon and leeks

I don’t trust people who don’t particularly care about food. You know the type. They eat because they have to and wouldn’t particularly care whether you gave them Marmite on toast or seared tuna with truffled cauliflower puree for dinner. In fact, they’d prefer the toast, because the whole thing would be over faster. If they could, they’d pop a pill three times a day in lieu of eating a meal if such a thing were possible. I just don’t trust them. It’s not normal, I tell you! I’m quite sure they’re just waiting for a signal from the mother ship and then they’ll all start shedding their borrowed human skin and start converting nitrogen straight into whatever cells make up their weird-ass, food disdaining, alien bodies. Fortunately (and maybe because of this fact) I married a very appreciative eater. I love cooking for bush man. He makes these little noises as he eats when he’s enjoying the food. Little “hmmm”‘s and “sho”‘s and “that’s good, add it to the list”s (there is no list of dishes I must remember to try again, but I really should start one, because he’s often told me to add things to it and I’m buggered if I can remember a single thing on there now other than this chicken). Anyway, when I made this dish, there were no less than five “hmmm”‘s in the first two minutes of eating, so I knew it was a winner. The original recipe is one concocted by my mom – one of my food heroes and the reason that “Must appreciate food.” was at the top of the list of attributes I looked for in my man. I just added bacon because, well, it’s bacon, and it should be added to stuff.

Cream cheese & herb stuffed chicken with braised leeks & bacon

Hands-on time

20 mins

Cook time

70 mins

Total time

1 hour 30 mins

Author: www.twosuitcasesandatinpot.com

Recipe type: Main

Serves: 4

Ingredients

  • 8 chicken thighs, skin on and bone in
  • cream cheese, sour cream & full cream Greek yogurt totaling 250ml (you can use only one or all three combined in whatever quantities you like, depending on what you have in the fridge, but I would definitely recommend the cheese & sour cream)
  • hand full of chopped, fresh herbs (thyme and chives work particularly well)
  • 125 grams bacon, diced
  • 300g leeks, thinly sliced
  • 1 cup chicken stock
  • a squeeze of lemon juice if you don’t use sour cream
  • 1 tablespoon flour
  • 2 tablespoons butter
  • Seasoning

Method

  1. Preheat the oven to 180 degrees C.
  2. Fry the bacon and leeks together over medium heat until softened. This should take about ten minutes. Sprinkle over the flour, stir through, transfer to a baking dish and pour over 250ml chicken stock.
  3. Combine the cheese mixture, herbs and seasoning. Gently ease the skin on the chicken loose with your fingers, keeping the side bits attached to create a pocket. That would be gross if it was Hannibal Lecter creating a skin pocket, but here it’s just clever.
  4. Using a spoon, gently stuff the cheese mixture under the skin, using it all up. It should be well stuffed.
  5. Place the chicken on top of the leeks and bacon, dot with butter and cover in foil. Bake for 40 minutes, remove the foil, and bake for a further 25 minutes or until golden. Serve with mash.

Notes

This recipe is lovely made with turkey at Christmas time!

Cream cheese stuffed chicken with leeks and bacon.

Molecular gastronomy: When playing with your food is totally okay.

Molecular gastronomy: When playing with your food is totally okay.
Balsamic jellies

Lime drops on soba and lemon whip chicken. Balsamic caviar and foamed olive tartin. Wild mushroom powder that’s washed down with bling. Either Willy Wonka has ventured into savoury, or these could be a few of my new favourite things.

Tsatsiki spheres

We spent an eye opening morning this week watching a molecular gastronomy demonstration hosted by Adrian Louw at Margot Swiss. What a treat! I’ve always thought of molecular gastronomy as being the domain of bald über chefs who cook out of labs in that wonderfully quirky world where food and  science meet. Not that being bald is the prerequisite, but you understand what I mean – fancy gadgets and dangerous gas bottles and equipment and processes with names that contain words like “centrifugal” and “hydrocoidal” and “thermoirreversable” and other terms that you would never associate with food. It’s a world where a humble hunk of blue cheese is not just relegated to a cracker or melted down with a bit of cream over pasta, but can be a foam, a powder, a gummy bear, a gel or anything else you could imagine. It has always seemed a little scary, a little too much to take on for the average home cook. But if there is one thing I learnt this week, it’s that ANYONE can take their cooking up a notch with just a few basic techniques and chemicals. Armed with one or two everyday kitchen gadgets, a handful of chemicals and a battalion of reappointed hair colouring tubes and nozzles (I kid you not), Adrian had us all oohing and aahing over his balsamic spaghetti, tzatziki “ravioli” and blingy, glittery honey pearls that you could pop into a glass of champagne. Other than the liquid nitrogen that could blow your arms off if not respected, there was nothing scary about creating extraordinary special touches out of store cupboard ingredients. Opalescent balsamic caviar lay shimmering on a salad in all of five minutes, and it took even less time to whip up the smoothest, creamiest ice cream I have ever tasted. I was honestly so inspired and so astounded at how easy some of the techniques seemed to be, that I rushed straight home and… did a quick roast chicken for dinner. Because, well, it was only a Wednesday and some things never change. But I’m bloody useless really, so don’t let me put you off! Molecular gastronomy is for everyone and I really want to encourage you to give it a bash! Despite my slow start, I definitely plan on incorporating more of it in my cooking!

For an absolute wealth of information on molecular gastronomy, including a free, downloadable pdf packed with recipes and how-to’s, visit Khymos.org.

Liquid nitrogen
Balsamic spaghetti

Browned butter lemon curd

Browned butter lemon curd

My idea of a well balanced breakfast is to have a slice of lemon curd toast in one hand, and a spoon full of cremezola in the other. Granted, you will not find this as the de jour diet in any of the glossies, but if you landed here by searching for lemon curd, then you probably don’t follow those things anyway. I absolutely adore sweet, tangy & jubilantly yellow hued lemon curd. Not that luminous yellow stuff that could double as a traffic cone in a pinch that you buy ready-made off the shelf in the supermarket. Real, homemade, butter laden curd made with love by your mom and packaged in a great, big glass jar that you can scoop spoons full out of when you need a culinary cuddle. But if mom is far away, or you’ve actually learned how to be self-sufficient, it is fantastically simple to make your own sunshine in a jar.

Browned butter lemon curd

A few years ago, I had a Blue Mountain lemon curd at our local cheese festival that I fell into instant besottedness with (only to hear that they were discontinuing the range!). The curd had a gorgeously nutty flavour. The type of gorgeously nutty flavour that can be achieved by doing one thing and one thing only: browning butter. You know what I’m talking about. And now you can’t imagine why anyone would ever make curd without browning the butter first, right? You can use your favourite lemon curd recipe and just brown the butter before using it as directed, or follow this easy one here. I used a recipe from that old standby that makes up a large portion of every warm blooded Afrikaner girl’s recipe repertoire, Kook & Geniet, and just tweaked it to reduce the risk of scrambling and make it a little more buttery. When in doubt, more buttery is always the way to go.

Browned butter lemon curd

Hands-on time

5 mins

Cook time

10 mins

Total time

15 mins

Author: www.twosuitcasesandatinpot.com

Recipe type: Condiment

Serves: Makes +/- 350ml

Ingredients

  • 330g sugar
  • 2 eggs
  • 1 egg yolk
  • 110g salted butter
  • Juice of two large lemons (roughly 400g in weight, whole)

Method

  1. In a heavy based pot, melt butter over a medium low heat. It will spatter at first and then start foaming, and not long after will turn brown fairly rapidly. Don’t be scared to get a good amount of colour on it, but stop before the salt and milk solids (which will sink to the bottom) burns. Pour the butter – salt and all – into a bowl and set aside.
  2. Add the sugar and lemon juice to the pot and bring to the boil. Once the sugar has dissolved, add the butter.
  3. Meanwhile, whisk the eggs and egg yolk in the bowl that the butter was in. Slowly pour the sugar syrup into the egg mixture, whisking continuously.
  4. Return the mixture to the pot and return to the heat, stirring until the mixture thickens. Do not let it boil or you will land up with sweet, lemony, scrambled eggs.
  5. Serve smeared on warm toast, swirled over ice cream, spooned onto meringue nests or poured into sweet tart cases.

Fillet of beef with Dijon tarragon sauce

Fillet of beef with Dijon tarragon sauce

Blogging is not for sissies. It takes a massive amount of time and dedication, neither of which I have in excess right now. It also requires the ability to switch your creativity on at will when you do actually find yourself with thirty minutes to spare. I really suck at that too. One solution, they say, is to write drunk and edit sober, and frankly I can’t afford to be inebriated that often. This means that I have a draft folder positively brimming with unfinished posts. A little reminder, whenever I log into WordPress, of my ability to cling, hoard, procrastinate and just hope for the best when I know nothing will change. Every now and then I will go back to it, and listlessly page through the articles, knowing that I will never get round to sharing them with you because they either no longer seem relevant, or I’ve forgotten what I wanted to say in the first place, or in one sad case, the restaurant in question had inexplicably shut down before I could tell everyone why they absolutely had to go there. And yet, I hang on to them, even though I know that it is over and that they will never be written.

I know I will never get round to showing you the Qipu clothing market in Shanghai, with its mind-boggling selection of clothing stores, where the items get more expensive and the sales ladies get less pushy as the escalator goes up.

Qipu clothing market

See? Start low, finish high.

Or the street-food-vendor-packed alley behind said clothing market, where I finally came across sanxian doupi with its delicate tofu skin encasing shrimp flavoured rice, and jiān bǐng with the fried pastry center that the my local Qingpu lady never added and I had been obsessing about since first hearing it was missing from mine.

sanxian doupi
jian bing

No really. If you’re in Shanghai, and you love shopping and eating, then this is a must-add for your trip list!

In order to tell you about the massive Tianshan Tea City that we visited, I learnt more about tea than any sane person should be expected to.

Tianshan tea city

But now you’ll never know the difference between the tea on the left and the tea on the right. (There, there now. You’ll get over the disappointment soon enough.)

I have a slew of posts on Shanghainese street food waiting to be written. For example, bet you didn’t know that Shanghai has more than 10,000 mobile food stalls? Or that in a government survey it was found that of 650 vendors surveyed, 609 had no business license? Or that sometimes your lamb skewer might be rat? Possibly poisoned rat. But that wasn’t going to stop me from encouraging you to try fire roasted sweet potatoes.

Fire roasted sweet potatoes

Or warm, cumin-y, delicious shao kao (street barbeque). “Lamb” and all.

Squid on a stick
20121009-P1180720

Or sweet and fresh bingtanghulu (candied fruits).

Alas, I know I will never get round to them. So I’m letting go, moving on, out with the old etc., all in an attempt to feel less bogged down by what I have not accomplished, in the hopes that I can expend more energy on what I still hope to achieve. I’m hoping for catharsis, although the reality will probably only be a bit more free space on my server, and a once again full draft folder a few months from now, because some things never change.

But before I hit the delete button, I have one unwritten post that I felt have to share with you!

Beef fillet with tarragon sauce

There are few things in life that give me as much pleasure as enjoying food with like-minded friends. Happily, I have been blessed with some very special foodies in my life! We don’t have it easy though. Living in a town where Wimpy is considered haute cuisine by many can be quite frustrating for fine dining lovers. I have raged about this before, and nothing much has changed since then. And so, my foodie friends and I decided to start our own Come Dine With Me competition. Four couples, four months, four extraordinary nights. A staggering amount of work went into preparing for each night, and afforded us all the opportunity of trying dishes that we would ordinarily consider too fancy for week night fare, or even your average dinner party. This beef fillet went a long way towards clinching the title for the winning couple, Niel and Pippa, who graciously shared the recipe with me. The recipe is from The Cliff, Barbados: Recipes by Paul Owens, a restaurant that was in the top 50 restaurants in the world when they visited there. I have paged through the book and can highly recommend it to anyone who would like to take their cooking up a notch! It has been a long time since I had this dish, but I can still remember the flavours as if they were melting in my mouth yesterday. Definitely one to add to your repertoire for when you’re having people around that you’d like to impress!

Fillet of beef on a potato rösti with Dijon mustard tarragon sauce & crispy leeks

Author: Paul Owens

Recipe type: Main

Serves: 4

Ingredients

  • 4 x 80z tenderloins
  • 3 cups chicken stock
  • 2 cups dry sherry
  • 1 ½ cups thick cream
  • ⅓ cup Dijon mustard
  • 2 tbsp fresh tarragon
  • salt and pepper
  • 2 leeks
  • 4 potatoes (peeled)
  • 4 tbsp of mixed chopped herbs i.e. marjoram, parsley thyme
  • butter
  • seasoning

Method

  1. Season the tenderloins and sauté in a hot pan with a little clarified butter until medium rare (about 3 minutes per side). Divide the meat between four plates and allow to rest for 10 – 15 minutes.
  2. For the sauce, bring the sherry to a boil and add the chicken stock. Reduce the liquid for about 10 minutes, then add the cream, Dijon mustard, tarragon and salt and pepper to taste. (Although the original recipe says to season here, I would leave that till the very end. You’re still going to reduce the sauce later, so it might become over salty.)
  3. Cut the leeks into fine strips and deep fry in hot oil until golden. Place on a paper towel and season with salt and pepper.
  4. Grate the potatoes and add the herbs and a little salt and pepper. Using your hands, squeeze out the moisture and form thin potato cakes. Sauté in hot butter until golden brown, drain on a paper towel. They can be made in advance and reheated.
  5. To assemble the dish, place the steaks in a warm oven. Meanwhile reduce the sauce in a pan over a high heat until a syrupy consistency. Place steak on warm potato rosti and cover with the sauce. Top with crispy leeks.

Crispy chicken and chickpea couscous with feta & lemon zest

Crispy chicken and chickpea couscous with feta & lemon zest
Crispy chicken and chickpea couscous

Families are funny things, aren’t they? While scratch-your-eyes-out loyal if anyone dares speak an ill word about one of our own, we are the first to voice an opinion about cousin Betty’s latest binge drinking session as soon as we can grab a second alone with a familial accomplice. My family is no different. So it was that I discovered what my family had been whispering amongst themselves over wine glasses in kitchens and murmuring to one another on tee boxes while taking practice swings: I had somehow achieved the dubious honour of being branded the couscous pusher in our family. There I was, happily dishing up fall-off-the-bone lamb shanks over steaming piles of fluffy couscous, when I noticed a distinctly uncomfortable silence fall over the table. The same sort of silence you feel in that moment just after the drug addict has made himself comfortable in the cushy armchair, but before someone clears their throat to tell him that the tea party he’s been invited to is actually an intervention. Uncle T steepled his fingers together (as he always does when he has something uncomfortable to say) and with a sideways glance at my equally unimpressed looking brother said, “What is this shit now again?”. Around the table there was a lot of looking in laps, and readjusting of wine glasses, but when no one backed him up he continued: “Uncle G says you’re always trying to get us to eat couscous”. Now, please note that – whilst true – the last time I had attempted this feat was Christmas 2007, when I had tried to slip some of the little granules past everyone by disguising them amongst cubes of roasted butternut and crumbly feta while they read out loud to each other those terribly lame jokes that come in the crackers. But it mattered not. I had become the couscous pusher. And with good reason I suppose. See, I believe the much maligned couscous has had a bad rap. When it was first introduced to our shores, it was inevitably prepared by uninformed housewives who dumped too much cube derived chicken stock over it in sufficient quantities to turn it into a crumbly heap of mushy sludge more closely resembling wallpaper glue than a fluffy accompaniment to a lamb tagine. This really is a grossly unfair representation of what couscous could be. Really, if you think about it, when it is prepared correctly, what’s not to love? Tiny granules of al dente semolina that slurp up all the flavours you throw at them, couscous is the caviar of pasta. Add to that, it requires no more than a spoon to eat, so it is perfect comfort food. I have therefore made a mini mission out of turning couscous into a dish everyone could love, instead of just an ineffectual projectile weapon in a B-grade movie. This dish might not complete my life’s work, but it is one of my favourites.

Crispy chicken and chickpea couscous with feta & lemon zest

Comfort in a bowl.

Author: www.twosuitcasesandatinpot.com

Ingredients

  • 4 chicken thighs, skin on
  • 1 tablespoon flour
  • 1 cup raw couscous
  • good quality chicken stock
  • 1 tablespoon oil
  • 2 cloves garlic, crushed
  • 1 tin chickpeas, drained
  • 2 heaped tablespoons of basil pesto
  • zest and juice of one lemon
  • 1 or 2 rounds of plain Greek feta
  • seasoning

Method

  1. Season the chicken on both sides. Cook in a dry pan over medium heat, turning occasionally, until cooked through.
  2. Remove the chicken from the pan and shred into bite sized pieces, discarding the bones.
  3. Pour off all but 1 tablespoon of the fat in the pan and return the chicken to the pan. Sprinkle over one tablespoon of seasoned flour and stir through to incorporate all the fat and juices and yummy caramelised bits on the bottom. Fry until crisp.
  4. In a separate bowl, combine 1 cup of raw couscous with chicken stock and prepare as per the instructions on the packet (different brands require different cooking methods and times.) Do not add more stock than the instructions say, or you’ll land up with the aforementioned wall paper paste.
  5. Add the chicken to the couscous and stir through.
  6. Heat the oil in the pan over medium heat and add the garlic, frying for a minute.
  7. Add the chickpeas to the garlic and fry for two minutes. Turn the heat down to low.
  8. Add the lemon zest, lemon juice and basil pesto to the chickpeas and warm through. Add to the couscous mixture and stir through.
  9. Crumble the feta into the couscous and stir through. Adjust seasoning and serve.

Nutrition Information

Serving size: 2

Peanut butter and white chocolate mousse

Peanut butter and white chocolate mousse

Pierneef à la Motte in Franschhoek is one of my favourite restaurants. The menu is constantly changing to reflect the seasons, so you always get the freshest, seasonal ingredients packaged in beautifully plated, explosive flavour combinations. Unfortunately this also means that you best not get your heart set on any one dish, as it may not be there the next time you visit. There is an important life lesson in this. Never put off till tomorrow what you can eat today! The bittersweet Valrhona chocolate tart with peanut butter mousse that I wrote about when I reviewed them in September was one such dish. While the rich chocolate tart itself was obviously delicious, the highlight of the entire meal (okay, a joint tie with the quail and orecchiette pasta salad with smoked pork lardo and almond ginger sauce), was the peanut butter mousse that accompanied the tart. Piped onto the plate into little mounds of salty moreishness, they were the unintentional star of the dish. So I was very disappointed when, on a visit there last week, the chocolate tart was no longer on the menu. After a week of hoping for a miserable rainy day, so that I could stare sadly out the window while I longed for that mousse, I realised I was unsuccessfully dealing with this blow, and decided to try recreating the mousse myself. I added white chocolate, so it is not quite the same, but it makes a similarly rich, lovely, dense mousse. Serve in little shot glasses, as an accompaniment to a tart (I served mine with a salted caramel cheesecake, but chocolate and peanut butter are made for each other when the bread and jam aren’t looking) or as a filling between layers of biscuits.

Peanut butter and white chocolate mousse

Peanut butter and white chocolate mousse

Hands-on time

10 mins

Total time

10 mins

Author: www.twosuitcasesandatinpot.com

Recipe type: Dessert

Serves: 4 – 8

Ingredients

  • 50g butter
  • 150g white chocolate
  • 2 eggs, separated
  • 70g castor sugar
  • 125ml cream
  • 175g smooth peanut butter

Method

  1. Melt the butter and chocolate together. Warm the peanut butter till it becomes a little more runny, and stir into the chocolate.
  2. Add two egg yolks to the warm chocolate mixture and stir through.
  3. Beat the egg whites till stiff peaks form. Slowly add the castor sugar to the egg whites while you continue whisking. Fold the mixture into the peanut butter mixture.
  4. Beat the cream till stiff. Fold the cream into the peanut butter mixture and serve.

Jew’s ear soup (hold the Jew’s ear)

Jew’s ear soup (hold the Jew’s ear)
Jew's ear fungus
Jew's ear fungus

Jew’s ear is a species of Auriculariales fungus found growing mainly on dead wood worldwide. And really, on a dead stump, far from the dinner table, is where it should’ve been left. It is a popular ingredient in many Chinese dishes and can readily be found on most restaurant menus – usually in the form of a cold salad, dressed with soy and vinegar, or in chunky pieces in soups. The mushroom itself is quite astonishing. The size of a hand and beautifully aubergine hued, they really do resemble ears in an almost disturbing way. But that is where the astonishment ends. To describe this mushroom as gelatinous with a mild flavour is to be unjustifiably kind. You know that little piece of cartilage you find along the breast bone of a chicken? The one that is so soft and thin, you don’t even realise you’ve cut through it until you unpleasantly bite down on a mouthful? Jew’s ears taste like that. Squeaky, softly rubbery, and with no discernible flavour at all. I am yet to try a dish I like them in. But I am nothing if not an adventurous eater, so I tried to incorporate them into a creamy mushroom soup.

 To make the mushroom soup:

1) Prepare your favourite mushroom soup recipe.

2) DO NOT use any Jew’s ear mushrooms in your soup WHATSOEVER. They are vile. They will bring nothing to the table in terms of flavour and will merrily add a yucky, rubbery texture that will not zip up with a blender. Attempting to use them in a creamy soup will have disastrous consequences. If you absolutely have to try them, here is a recipe for soup that uses them whole.

Cheesy pork chops au gratin with creamy asparagus

Cheesy pork chops au gratin with creamy asparagus

And now, regular broadcasting will continue. And just to prove that I am not completely blinded by my animal love, and that I do understand the need for a balanced, humane and sustainable way of feeding this planet’s exploding population: A post on pork chops.

The adage that you should not judge a book by its cover is, in my humble opinion, completely inapplicable when it comes to food. Yes, I might quietly deduct a point from a restaurant’s score when they feel the need to advertise their food by using photos on their menu (thanks for ruining picture menu’s for me Gordon Ramsay – they’re the only way I know what I’m eating in China and now your Kitchen Nightmares rants have left me reeling as I wrestle with the restaurant photo-menu paradox: I should not be eating in a restaurant that puts photos of their food on their menu, but the only restaurant I can eat in without inadvertently ordering turtle soup with a soupçon of sea slug is a restaurant that puts photos of their food on their menu), but I will also seldom be persuaded to cook something unless it is accompanied by a photo to sell it to me. But I am going to ask you not to judge this dish by its cover. While it might look ugly to the point of being off putting, it is really, really good. In fact, Bush Man declared it the best thing he’s eaten in China – and we’ve been to Mr.& Mrs. Bund. And while it’s not exactly fine dining, and I suspect he was just trying to get into my pants, it does make for an exceptionally good and laughably easy family dinner.

If you found this post searching for “cooking with Chinese vegetables” then you probably think that asparagus is a shameful cop out. But I have included this recipe under that section, because not only is asparagus cheap and plentiful here, but they are really delicious. Tender and sweet with loads of asparagus flavour (as opposed to, you know, leek flavour, or Fresca maybe.) And in the supermarket they are as eye catching as hair vegetable or balsam pear, because they are freakishly long here, so you don’t feel like snapping off the tough end and tossing it away is such a waste. The secret to this dish is to use the best quality pork and asparagus you can find, because the flavour comes solely from these two ingredients.

Cheesy pork chops au gratin with creamy asparagus

Cheesy pork chops au gratin with creamy asparagus

Serves 4

Author: www.twosuitcasesandatinpot.com

Recipe type: Main

Ingredients

  • 4 large pork chops – rinds removed and reserved
  • a bunch of fresh, green asparagus, cleaned, chopped into 1 inch pieces and tough bits discarded
  • 2 tablespoons butter
  • 10ml flour
  • 125ml cream
  • 200ml grated white cheddar or Monterey Jack cheese (optional)
  • seasoning

Method

  1. Season the chops and grill in the oven till just done. Use the smallest dish you can that will hold the chops and the asparagus sauce.
  2. Meanwhile, melt the butter in a saucepan and saute the asparagus for two or three minutes until tender.
  3. Add the flour to the asparagus and stir to combine with butter. Cook for a further minute.
  4. Add the cream to the asparagus and stir until you have a smooth sauce.
  5. Pour any pan juices that might have collected from the chops into the sauce and stir.
  6. Pour the sauce over the chops, top with the cheese and grill until golden and bubbly.
  7. Season the pork rind and place under a hot grill till it goes crackly. Serve with the chops. Good with mash or hot chips!

Potato Caesar Coleslaw Salad

Potato Caesar Coleslaw Salad

It’s not easy trying to cook like home in China. Things we take for granted every day can suddenly only be sourced through an internet search and a three hour long quest into the city. Lettuce is no exception. Don’t get me wrong, we can get lettuce in Qinpu. The varieties available are: Lettuce. That’s it. Chinese lettuce (yes, that’s really a thing). Salads get boring. They all look the same. They all taste the same. But what we can get is a wide variety of other leafy Chinese vegetables which we have started using raw as a lettuce substitute to curb the boredom. Hangzhou bok choi is one such vegetable. It is similar in texture and flavour to a Savoy cabbage, but has the added bonus of providing a fresh crunch to salads, thanks to its large midrib. So what do you make when you essentially have a cabbage, a few potatoes and a teeny tiny fridge (really, you should see it, shove a 5L water bottle in there and you’re pretty much at capacity) that needs a small half jar of mayo cleared out on a first in first out basis? Well, naturally, you make a Potato Caesar Coleslaw salad, of course.

This is a salad with an identity crisis. Like that country gal who runs away from home and moves to the big city to become an actress, only to pack it all in and go back to harvest the apple trees with pappa, it wants to be a fancy Caesar salad, but knows it is ultimately a good ‘ol potato salad at heart. You can substitute the bok choi for white cabbage, or pretty much any raw, leafy veg.

Hangzhou bok choi caesar potato salad

Serves: 4

Ingredients:

1 head of Hangzhou bok choi, finely sliced (equivalent to a 300g pillow pack of lettuce)

4 large potatoes, boiled, peeled and cubed

250g bacon, cooked and chopped

4 to 6 eggs, hard boiled, peeled and sliced in half

3 spring onions, finely sliced

Caesar dressing to taste

Mayo to taste

Method

1) Combine equal quantities of dressing and mayo (as much as you prefer on a salad), season and set aside.

2) Toss the potatoes and bok choi together, pour over the dressing and give a light stir.

3) Pile the potatoes on a plate and top with the eggs, bacon & spring onions.

Spicy prawn & coconut cream soup

Spicy prawn & coconut cream soup

There has been no time for cooking these last two months. Dinner has consisted mostly of Grand Chicken Ranch burgers from McDonald’s (the three lettuce leaves, slice of tomato and single onion ring constituting my 5-a-day as far as I am concerned) or toast. So it’s been rather nice to have someone to cook for and have a bit of time to get into the kitchen again. Even if that kitchen is a desk and toaster oven in a tiny Chinese hotel room, and finding ingredients for a specific recipe could mean a three hour round trip to the Avo Lady. If you’re in Shanghai, you can find lemon grass here (and only here, as far as I have been able to tell).

This is one of my all-time favourite recipes. The extremely obliging people at  Woodall Country House & Spa in the Sundays River Valley were kind enough to pass the recipe along after my book club spent a pampered weekend there a few years ago, reading nothing but wine labels and enjoying their exceptional cuisine and warm hospitality. It is dead easy and very, very good. The butternut blends to a velvety, smooth soup without the need for straining and the Thai flavours turn what would ordinarily be standard weekday fare into something a little special.

Thai butternut soup

Serves 4

Ingredients

15ml oil

1 onion

2 cloves garlic

3 small chillies (or to taste), chopped

20ml lemon grass, minced

2 chicken stock cubes (or tubs, or sachets, depending on your budget) dissolved in 750ml water

500g butternut (or pumpkin), diced

400ml coconut cream

250g cooked prawns (I like to grill whole prawns and then deglaze the oven dish with the water I need to use for the stock. I also prefer whole prawns in the soup, even if it’s a bit messy.)

1) Heat oil in a pan. Add the garlic, onions, chillies & lemon grass. Cook until the onions are soft.

2) Add the stock and bring to a boil. Add the butternut and simmer for ten minutes until soft.

3) Blend. (With a blender, if “blend” isn’t clear enough.)

4) Stir in the coconut cream and heat through.

5) Add the prawns and serve. Alternatively pour the soup into bowls and top with the prawns.

Cooking with kids: Ye ol’ standby muffins

Cooking with kids: Ye ol’ standby muffins

A guest post by Miss Rachel Carlin

Kiddie muffins

My mom always told me that there are two things every girl should have: a qualification and a driver’s license. I have increased the list to include a dress that makes you feel like a diva, a string of pearls and a flattering bathing suit. I would like to add a sub clause to this. Anybody who spends a significant time with children, be it as babysitter, parent, grandparent or teacher should have at least one book they know off by heart that they can “read” to the child whilst fantasising about an ice cold glass of bubbly to be had once the child is in bed; a simple craft activity using an old loo roll; and a basic muffin recipe.

As that great purple dinosaur keeps telling us, sharing is caring, so here is my basic muffin recipe. Think of it as the maxi dress of baked goods: pretty good for most occasions and one size fits all. I halve the amounts (well, not the egg) and make mini muffins. I add sprinkles to the batter and make rainbow muffins.  I mash up bananas and add cinnamon for – and here is the kicker – banana and cinnamon muffins. I have even added grated apple, blue cheese and walnuts and served them to adults. If I add anything obviously savoury, I omit the sugar and vanilla essence.

Ingredients:

  • 1 cup regular flour
  • 1 teaspoon baking powder
  • 1 teaspoon bicarbonate of soda
  • Pinch of salt
  • 1/8 C butter, softened
  • ½ C sugar
  • 1 egg
  • 1 t Vanilla essence
  1. Preheat the oven to 180C
  2. Line a 12 muffin pan with muffin casings.
  3. Sift the flour with the baking powder, bicarbonate of soda and salt.
  4. Cream butter with the sugar until light and fluffy in a large mixing bowl. Obviously the softer the butter, the easier this is.
  5. Add egg to sugar and butter mixture and beat well.
  6. Add flour mixture to wet mixture and mix until smooth.
  7. Pour into the muffin casings and bake for approximately 20 minutes.
  8. Turn out and cool.

If you are that way inclined, you could ice the little darlings. And also the muffins.

Banger & bacon breakfast scones

Banger & bacon breakfast scones

How do I love thee bacon? Let me count the ways. Last weekend I loved it chopped up and turned into breakfast burgers. A great TV meal for when no one can tear themselves away from the Super Rugby for long enough to locate the knife and fork lying in front of them. I wanted to serve these banger and bacon patties on scones so as to be more breakfast-like, until I remembered I can’t actually make scones. While they taste good, they look a little like doughy, cellulite prone pucks, and could probably be used successfully in a short ice hockey warm up match. The problem, I suspect, is that the scone dough should be just, just mixed and then left alone, whereas I like to prod and knead and poke and generally overwork the whole thing when I should actually just have walked away. Just ask any ex-boyfriend of mine. Then I remembered how Americans serve their scones (or biscuits) drenched in gravy, and my problem was solved! I made scones using a recipe from that old standby of South African housewives everywhere – Kook en Geniet – adding a packet of brown onion soup powder to the dry ingredients to get the onion flavour I was looking for without having to do any actual work. I then drenched the whole lot in mushroom sauce to hide how ugly my baking had turned out. Hollandaise would work well too. Top with a poached or fried egg and breakfast is sorted!

Banger and bacon burger

Serves 6:

Ingredients

12 pork banger sausages, filling removed from the casings

250g streaky bacon, finely chopped. (Place the bacon in the freezer for half an hour before cutting to make it easier to slice.)

1) In a mixing bowl, add the bacon to the sausage filling and combine well. Shape into burger patties, about 10mm thick. If you want a thicker patty, fry the bacon, allow to cool and then add it to the sausage filling. If the mixture is too sticky to work with, lightly flour your hands and the working surface to make it easier.

2) Heat a very small amount of oil in a pan and fry the patties, turning once, until brown on both sides.

Cong you bing revisited

Cong you bing revisited

I have not been sleeping well at all. My bed has once again become that magical place where I suddenly remember everything I was supposed to do that day, but didn’t. And I know that once I crawl out from beneath that white duvet I will once again, in a foggy haze of procrastination, forget everything that I vowed to do in the wee hours of the morning. So I have taken to sleeping with a pen and notepad next to my bed so that I can jot down things in the dark as I remember them and clear them from my mind. This hasn’t worked as well as you would think. Upon waking this morning I found a message to myself reminding me to “Char doc squikle skorf”. While I don’t think this was intended to be an inspired grill idea, it did remind me that I still need to post my cong you bing recipe. I have adapted the recipe from one found at Traditional Chinese Recipes to more closely resemble the thin and crispy pancakes that our local vendor made. It is essential that you make the dough two days before you intend to use it to allow the gluten to bind. This is a great recipe to use when doing a Mongolian grill and everyone can get their hands dirty cooking their own (in which case most of the pancakes will, in all likelihood,  be wonky, a little burnt and the object of much ridicule).

Cong you bing

Ingredients

300g all purpose flour

6 spring onions, leafy green parts finely chopped (you can reserve the chopped whites and use in the paste)

1/2 tsp salt

1 tb vegetable oil

115g of boiling water (yes, grams Heston)

70g of cold water

spicy basting paste

Add the boiling water to the flour and stir. When it is well incorporated, add the cold water and continue mixing until it is smooth. You will have a very wet dough. Oil your hands and collect the dough into a ball. Place in a plastic bag in the refrigerator and allow to stand for two days or so.

With oiled hands, turn the dough out on to a smooth, oiled surface and flatten into a rectangle approximately 1cm thick. Sprinkle with the salt and spring onions and press them into the dough. Fold the dough in half and press down to 1 cm thick again. Rub the surface of the dough with your oiled hands, fold and press down again. Do this four or five times so that you layer the dough with oil and spring onions, similar to what you would do with puff pastry. Now grab a hand full of dough (a little bigger than the size of a golf ball) and roll it out with an oiled roller till you have a disk about 2mm thick. It’s a little slippery and tricky, but you’ll get the hang of it eventually. If a hole appears, don’t worry about it.

In a heavy bottomed pan, heat a few tablespoons of oil. (If you haven’t noticed by now, this is not Weigh Less and enough oil in the pan is essential or it’ll taste yuck.) Lay the pancake in the oil, away from you. Cook until lightly browned and then flip it over. Brush with the paste, cook the other side until browned and then flip back for 5 more seconds, just to heat the paste through. The sugar in the paste will burn if you leave it too long. Serve cut into rectangular slices.

For the spicy basting paste:

2 onions, very finely chopped

chopped fresh red chillies to taste

80ml oil

15ml paprika

10ml cumin

20ml coriander

4T sweet chilli sauce (pretty sure the Chinese don’t use this, but it works!)

Heat the oil in a heavy based saucepan and add the onions. Cook slowly until they begin to caramelise. Add the chillies and spices and continue cooking until the whole mixture turns into a gloriously, jammy, paprika hued concoction. Add the sweet chilli sauce and cook for a few more minutes. You’ll be left with a jammy oil that is perfect for basting your cong you bing.

Cooking with kids: Simple soufflés

Cooking with kids: Simple soufflés

By Rachel Carlin

When I am not mentally menu planning for the fantasy Bistro that I wish I owned with my favourite girl cousin by marriage, I am taming ankle biters. I am very lucky that this is a job I love and that it brings me a lot of joy. It also allows me on a Tuesday to bring my other love, cooking, into the classroom.

Simple souffles

Cooking with children doesn’t need to be dull. It doesn’t need to involve chocolates, sprinkles and E numbers. It can be fun, yummy for both big and small and strangely rewarding when no child is hurt in the making of the dish!

This is one of my favourites. I cannot seem to name it, so the working title is:

Simple Soufflés

Makes 6 little soufflés

Ingredients:

  • 3 slices of white bread
  • 2 eggs
  • 200ml milk
  • 100g cheese
  • Salt and pepper
  • Dried mixed herbs
  • Some oil for brushing

 Preheat the oven to 200 C

  1. Grate the cheese and place in a bowl. – Teacher’s tip – allow your young child to grate the cheese, but place your hand and fingers over theirs so they get the feeling and the motion of grating without the danger of shredding fingers.
  2. Using a regular size circle cookie cutter, cut out two circles from each slice of bread.
  3. Brush a muffin pan with some oil and then place the bread circle inside. This will form the base of your soufflé.
  4. In separate mixing bowls, break the eggs and separate.
  5.  Whisk the egg yolks together very quickly until they turn creamy.
  6. In another bowl stiffen the whites, not to the peaks needed for meringues but allow them to hold shape.
  7. Add the milk, herbs, salt and pepper to the yolks and mix thoroughly.
  8. Add half the cheese and give a good mix.
  9. Gently fold in the whites.
  10. Carefully pour over the 6 muffin pans ensuring even distribution of the mixture.
  11. Top each mini soufflé with the remaining cheese.
  12. Bake in the oven for 12 – 15 minutes until golden.

 And that’s it. A dollop of Mrs. Balls on the side is rather good.

Peanut butter and chocolate cheesecake

Peanut butter and chocolate cheesecake

When Nigella first described this recipe as a Reese’s Peanut Butter cup in cheesecake form, she had me at Reese. It’s a baked peanut butter and chocolate cheesecake. I don’t need to say any more.

Peanut butter and chocolate cheesecake

The ingredients should be at room temperature before you start.

Ingredients

For the base

  • 200 grams tennis biscuits (Nigella uses digestives, but I have a debilitating weakness for tennis biscuit bases)
  • 50 grams salted peanuts
  • 100 grams dark chocolate chips or a slab broken into pieces
  • 50 grams butter

For the filling

  • 500 grams cream cheese
  • 3 medium eggs
  • 3 medium egg yolks
  • 200 grams castor sugar
  • 125 ml sour cream
  • 250 grams smooth peanut butter

For the topping

  • 250 ml sour cream
  • 100 grams milk chocolate
  • 30 grams soft light brown sugar

Method

  1. Preheat the oven to 170°C.
  2. Process the biscuits, peanuts, dark chocolate and butter for the base in a food processor. (I only have that little food processor that you bung onto the end of a stickblender, but it worked just as well when you do it in batches this way and then mix it all together after. Great arm workout too.)
  3. Once it comes together in a clump, turn it out into a 23cm springform tin and press into the bottom. Reserve a good tablespoon full to consume right now. You know you have anyway!
  4. Put in the fridge while you make the filling.
  5. Process all the filling ingredients together till you have a smooth mixture. You can just whisk the whole lot if you don’t have a processor, but then be sure to bang out the air bubbles or there will be cracks in your cheesecake. Not the end of the world, but avoidable.
  6. Pour and scrape the filling onto the base in the tin and bake for 50 minutes. Check the cake and if necessary, bake for a further ten minutes. The cake should be like your thighs after Christmas when you’ve ruined a year’s workouts in two weeks – just, just firm to the touch but with a bit of a wobble perceptible underneath.
  7. Take the cheesecake out of the oven while you make the topping.
  8. Warm the sour cream and chocolate with the brown sugar gently in a small saucepan over a low heat, whisking to blend in the chocolate as it melts, and then take off the heat.
  9. Spread the topping very gently over the top of the cheesecake.
  10. Put it back in the oven for a final 10 minutes.
  11. Once out of the oven, let the cheesecake cool in its tin and then cover and put into the fridge overnight. It gets better the longer it stands.
  12. When you are ready to eat the cheesecake, take it out of the fridge, just to take the chill off, but note that it will get even more gloriously claggy the longer it stands.

Bernice’s lamb chops

Bernice’s lamb chops

This is one of those recipes that you’ll probably either love or hate. Personally, I love it! It is the meal I would choose when I finally snap in Telkom one day, wipe out the lot of them, and have to pick something to eat before they eventually flip the switch and fry me. It is a quintessential part of some of my earliest food memories. Monday night was not only Knight Rider night (back before he became The Hoff and crushing on him was no longer cool), but it was also the night my brother and I stayed with my dad and Bernice, our nanny, made her famous chops and chips. Bernice might not have been the creator of the dish, but it is a testament to how important she was in our lives that we chose to name this dish after her, despite her tendency to chase us around the house with a wet rag when she was displeased about something. And now, more than twenty years later, my dad still makes it for us whenever we go and visit there. So I’m quite aware that the love I feel for this particular dish is heavily influenced by the memories it evokes and is not based solely on its gastronomic merit. I do, however, still believe it is simply delicious in the truest sense of the word. All the flavour comes from just two ingredients – lamb and onions. But don’t let the simplicity of the components fool you – preparing this dish requires patience and a good, uninterrupted, 2 hour chunk out of your day. It is best served with the type of shoestring fries that are so crispy that trying to impale them on a fork results in little bits of golden potato flying across the room and hitting the wall with a satisfyingly crunchy thunk. This necessitates really getting your hands in there to pull the chops apart bite by bite, scoop up a few chips and shove the whole lot in your mouth with your fingers, which is just messily wonderful! I would also strongly recommend having it with a good tomato sauce. I don’t believe in dousing meals in condiments that could potentially detract from the flavour, but in this instance the tangy sweetness of the tomatoes contrasts beautifully with the salty sweetness of the caramelised onions.

Bernice's chops & chips

Serves 4

Ingredients

5 large onions, sliced

1 kg lamb chops – loin is best, but any cut will do

salt and ground white pepper

3T canola or sunflower oil

2T butter

1) Place a heavy based pan (big enough to fit all the chops in a single layer) on medium heat and add the oil and butter.

2) Add the onions and a bit of salt and pepper and fry slowly. Slowly now. Don’t let it brown too quickly. Once the onions are translucent, push them aside in the pan and add the chops. Season and brown the chops on both sides and stir the whole lot around the pan every few minutes.

3) That’s pretty much it. But pour yourself a glass of wine, because you’re going to be here for a while. Now you just continue doing this for the next ninety minutes or so. As the onions and meat catch on the bottom of the pan, scrape those lovely caramelised bits off with a wooden spoon and keep incorporating them back into the onions. If you need to, add a tablespoon or two of water to deglaze the pan as you go, but keep it fairly dry. The closer to the end you get, the more it will catch and the more you’ll need to stir it. Season and don’t be shy with the salt.

What you’ll eventually be left with is a gorgeously glossy caramelised compote to go with the tender lamb chops that will taste even better if you leave the whole lot in the fridge for a day so that the flavours can develop. If it’s a little too fatty for your taste, just tilt the pan to the side and scoop off any excess fat. (Sorry Dad, I didn’t really mean that!)

Lemon meringue ice cream

Lemon meringue ice cream

Let me preface this post by saying that I really suck at making meringues. This is mildly embarrassing as I have an aunt whose meringues would put Nigella to shame. So if you’ve landed here in the hopes of finding a fool proof way of making light and airy meringues, then you better move along. These meringues are strictly for fools and were sort of stumbled upon when the very first thing I baked in my new and unknown little toaster oven was a dish that required precision temperatures. Clever. So I was toggling between bake and grill and 210º and 100º to try and reach the magic 120º for the sustained period required when making meringues the way they should be when I thought buggr’it, they’re going in at 150 for half an hour. This is higher than you’d normally bake meringues. The result of a lower temperature is an airier but drier meringue because the whole thing is baked through slowly and the air bubbles are trapped in a permanent state of sugary suspension. Fortunately, I like my meringues a bit on the gooey side when I bite into them. (Which also explains why mine are rather ugly… But as I’ve gotten older I’ve realised that looks are less important than personality anyway.) So the higher, shorter temperature worked a treat to get them golden on the outside but still uncooked enough on the inside that when I opened the door and they cooled down too quickly, the entire lot collapsed into a cracked heap of toasty, marshmallowy goodness.

If I lost you at “toggling”, then I suggest you completely ignore the entire section on meringues below and try Nigella’s cappucino pavlova instead. Needless to say, omit the espresso. The ice cream recipe is a fantastic vanilla standby as, unlike most homemade ice creams, it doesn’t require you to break up ice crystals every now and then like some sort of demented, commando going character from Basic Instinct. Make a batch and then add whatever flavours you want to zhush it up a bit. Here lemon did the trick.

Lemon meringue ice cream

Use 8 individual tart tins or one large one.

Serves 8

Ingredients

For the ice cream

300ml milk 

4 large egg yolks (reserve egg whites)

75g Castor sugar

250ml cream

5ml vanilla extract 

The juice of three lemons (Before juicing, zest with a fine blade zester and reserve zest. Zest. Zest. Zest. It sounds funnier the more you say it.)

Heat the milk to just before simmering and remove from the heat. In a bowl, whisk the yolks and sugar together until light and fluffy. Slowly (slowly now, or you’ll be sorted for tomorrow’s scrambled eggs*) pour the milk into the egg mix and whisk quickly as you go. This next part is a bit annoying. Grab a book and take a few deep breaths because yes, it does take a while (fifteen to twenty minutes, but it feels like an hour) but no, you can’t walk away, even for a minute. Return the pot to a low heat and stir constantly until the mixture thickens to the consistency of thin custard. Do not boil*! Stir in the vanilla essence and lemon juice and set aside to cool. In another bowl, whisk the cream till soff peaks form. Slowly fold the custard into the cream, combine well and place in the freezer overnight. As I said, the nice thing about this recipe is that it does not usually require you to break up any ice crystals like you normally have to do if you don’t have an ice cream maker. But just to be sure, check the ice cream in a few hours time and if there are any ice crystals, either whisk before it is fully set or blitz up with a stick blender.

For the candied lemon rind

Lemon zest from three lemons

Half a cup of sugar 

Castor sugar for sprinkling

Place the zest and sugar in a pot and add a cup of water. Simmer for 45 minutes until the zest is translucent and the mixture is the consistency of thin syrup. Remove the strands of zest and place on a silicone mat to dry, separating them as much as possible. Once cooled and firm, toss in a little castor sugar, cover in cling wrap and set aside.

For the biscuit base

1 packet tennis biscuits, finely crushed

200ml melted butter

Combine the biscuit crumbs and butter and mix well. Press the mixture into the base of your tart tin(s) – the base should be 3 to 4mm thick. Cool in the fridge.

For the meringues

4 egg whites

Pinch of salt 

Castor sugar

Cream of tartar

Vanilla essence

Preheat oven to 150˚C. Beat egg whites with salt and cream of tartar until stiff. Add castor sugar by the spoonful, beating well between additions and adding the essence just before the last two spoonfuls. Line a baking sheet with a silicon mat and spray with Spray & Cook. Shape the meringues on the baking sheet so they’re slightly smaller than your tarts – they’ll swell a bit. Alternatively (and the easier option) pipe small meringues. Bake for 30 minutes or so until lightly golden. The meringues will be chewy on the inside. Allow to cool and then lift with a spatula.

To assemble

Remove the ice cream from the fridge and soften slightly. Spoon ice cream into the tart moulds, pressing down onto the biscuit base and ensuring there are no air bubbles. Smooth the top with the back of a knife and return to the freezer for at least a couple more hours or until you’re ready to serve. To serve, unmould the ice cream and top with the meringues in whichever way you fancy. Serve with the candied lemon zest.

Biltong & Blue Cheese Dip

Biltong & Blue Cheese Dip

The silly season is in full swing. Time to overeat, fight the masses to get your last minute shopping done and exercise your rage control as drivers everywhere forget the basic rules of the road. I say rather stock up your freezer and spend your precious time catching up with friends and family over glasses of chilled wine (or mulled, should it be winter where you find yourself) and tables full of good things to eat. If you need something quick and easy to serve as a snack when people are getting peckish, try this spread-slash-dip to serve with crackers or melba toast. I got the idea after trying a so-so-ish biltong spread bought at the shops. Upon inspecting the label I realised that there was, in fact, absolutely no biltong in it whatsoever. I was sure that adding biltong to a biltong dip would be the natural first step to improving it. Genius right? But please don’t entertain the idea of using that horrible powdered biltong instead of the good stuff. That’s only good when it’s dusted by a little grey-haired lady on to marmite slathered bread cubes and served on a paper doily with a nice cup of tea at the NG church’s bazaar where, let’s be honest, it is damn awesome. Adding blue cheese to anything, of course, makes it better. It also means that this dip packs a serious flavour punch. If Ye Old Ranch is the party dip equivalent of the mousy girl who sits timidly in the corner, looking a little lost and only spoken to when asked where the toilet is, then this dip is the loud guy adjusting his crotch, hocking one back and drawling “Are you talking to ME?”.

Biltong and blue cheese spread

Ingredients

60g sliced biltong (Place the biltong in the fridge overnight, uncovered, to make it easier to process.)

125ml cream cheese or creamed cottage cheese 

3ml coriander

2T chutney

100g blue cheese, grated (If you prefer cheese withouth the ability to put hair on your chest, use something creamy and  not too strong. A cremezola is perfect.)

Milk (optional)

1) In a food processor, chop the biltong into bits. It shouldn’t be too fine – around 3mm pieces.

2) Combine the biltong with the remaining ingredients, adding a little milk to get it to the consistency you prefer, and serve.

Medley of Seafood

Medley of Seafood

I had one of THOSE days again. I pretty much went into panic mode about my occupational / living / geographical status.

Don’t get me wrong, being a lady of leisure and traveling all over the place is bloody, damn awesome. Particularly as I somehow managed to find a husband who will virtually beg me to spend a bit of money on myself and never makes me feel guilty that his was the career we chose to nurture while I get to sleep in late when I want to. But every now and then – between the lunches, and copious amount of reading and experimental cooking time – I suddenly realise “Holy crap, I don’t have a job. My husband is a contract worker. We don’t know where the next job will be. When don’t know WHEN the next job will be! We don’t know where we’ll be next week, let alone next month!! I don’t even know what to fill in when asked for my residential address!!! I don’t know what to fill in where Facebook asks what city I live in!!!! I can’t breathe!!!!!”.

But on days like this, there is one thing I can count on to quiet the voices, ease the pressure, still the storm and envelope me in a warm, cuddly haze of happiness: Food. Those dishes that evoke a happy childhood memory, or remind you of a special time and place with special people or, simply, remind you that no matter how crazy and unpredictable and scary your life might seem right now, you can always count on a few things to stay the same. The right meal can achieve all that. Your favourite spaghetti bolognaise recipe will taste today like it did last week or last year or the first time you closed your eyes and savoured that second mouthful (the first mouthful you just shoveled down of course, because it was just spaghetti right, how good could it be?). This is one of those dishes. A very special take on something resembling a bouillabaisse that reminds me of home and my mom. It is also one of the first things I remember making after I discovered that I rather loved cooking, so adding a bit of orange zest to some fish was very shoo-wow! Some people would get comfort from aunty’s cottage pie or granny’s chocolate cake or matron’s mash. I found it in a bowl of my mom’s seafood broth.

What dish do you choose when you’re in the mood for a bit of nostalgic psychotherapy? Google Analytics tells me there are loads of you out there reading my blog, but you’re all rather quiet. I’d love to hear from you! What passes for mash in Jakarta, Nottingham, Madrid, Glenorchy or Roodepoort?

From Elsa van der Nest’s fabulous book, Simply Entertaining.

Serves 6

Ingredients

olive oil for frying

2 medium onions, finely chopped

15ml garlic, finely chopped

45ml mixed fresh herbs

45ml fresh basil

2 bay leaves

seasoning

2 x 400g cans whole, peeled tomatoes

30ml tomato paste

200ml dry white wine

500ml fish stock (Ina Paarman’s liquid concentrates are worth a try)

500ml mussel stock (use reserved cooking liquid when preparing mussels)

25ml triple sec liqueur

25ml brandy

finely grated zest of half a lemon

finely grated zest of 1 orange

600g line fish, cut into 4cm squares

300g calamari rings

36 prawns

24 mussels, cooked, on the half shell

basil leaves for garnishing

Method

1) Heat oil in a large pot. Add onions, garlic, herbs, basil, bay leaves and seasoning and sauté until tender.

2) Add tomatoes, tomato paste, wine and stocks. Simmer gently for 40 minutes.

3) Add liqueur, brandy and zest and simmer gently for a further ten minutes.

4) Liquidize the mixture until smooth then pass through a fine sieve. At this point you could refrigerate for a few days and just continue when you’re ready to serve.

5) Gently reheat the sauce. Add the line fish and cook for 3 minutes. Add the calamari, prawns and mussels and simmer for 2 minutes more.

6) Garnish with basil and serve with squid ink pasta.

Exceptionally Lazy Rainy Day Prawn Pasta

Exceptionally Lazy Rainy Day Prawn Pasta

If you’re a three-hours-or-longer-Friday-lunch kinda person, the Chinese work ethic can take a bit of getting used to. It’s no wonder they’re taking over the world one “Made in China” label at a time – they work like machines. So my husband works really long hours. We hardly see each other on a work day and then he only has one in every twelve days off. Needless to say, rain days have become very precious to us, because he gets to stay home. We get so ridiculously lazy on these days. We COULD use them as a precious opportunity to spend some time together exploring all the fascinating new places around us. But when that call finally comes, confirming there will be no pick up that day, we inevitably turn to each other and, slightly embarrassed at our anti-wanderlust tendencies, timidly suggest simultaneously, “Movies?”. We will then proceed to spend the entire day in bed watching movies, only emerging to make tea or something to eat. On one such day, while one of the many typhoons that battered China’s eastern coast this summer was raging outside, I hit a personal low on the uselessness scale. I got up around four in the afternoon, still in my nightie, and looked in the mirror (probably to check for bedsores). The mirror is behind the bedside lamp and the globe is naked because the hotel uses these ridiculously ostentatious lamp shades that are all shade without the lamp bit. They are so covered in gold they don’t let any actual light through so I’d removed it. Anyway, I leaned into the mirror and accidentally burnt my boob on the globe! I pulled my nightie away and was horrified to discover I had burnt a blister right through the fabric! I was also a little confused as, while it had smarted a bit, it didn’t seen to be as sore as a big, brown blister warranted. Nonetheless, it was not lost on me that I could use my injury as a means of getting out of tea making duty for the rest of the day. So I put on my best quivering-lip face and, nursing my injured appendage, made my way to my husband to garner some sympathy. I was just rounding the corner of the bed, wondering whether limping a little would be overkill, when my blister fell off. We stood there staring at it for a few seconds until realization dawned: The blister was nothing more than an errant popcorn kernel, stuck there from wolfing down a bowl from a prone position hours earlier. So it was on this day – trying to make up for being caught at such an obvious deception just to get out of tea making duty – that this dish was conceived. Adam declared it to be one of his favorites. The inspiration came from my mom’s preferred way of doing prawns. The original recipe (from a Vroue Federasie cook book from yore) used lemon juice (and had a few different tweaks I don’t recall) which is an ideal substitute for when you’d rather drink your wine than cook with it. This pasta dish is perfect for days when you are so lazy, that anything you eat needs to take ten minutes or less to cook from start to finish. Maximum impact with ridiculously little effort.

Serves 2

Ingredients:

2 tablespoons butter

2 cloves garlic, crushed

3ml dried thyme

200g prawns, raw and shelled

about half a cup of dry white wine

half a cup of cream

a pinch or two of paprika

a few drops of Tabasco sauce (If you’re in SA, use a teaspoon of peri-peri Aromat. That’s right, I just said that. Use more if you like things hot. )

salt and pepper to taste

as much or as little pasta as you like

Method:

1) Put the pasta on to cook according to the instructions.

2) Over medium heat, melt the butter in a pan. Add the garlic and fry for a minute. Add the thyme and prawns and fry till the prawns are pink and almost cooked.

3) Add the wine and boil for a minute or two till reduced by half, then add the cream, paprika, tabasco and season to taste. Drain the pasta, toss with the prawns and cream and serve.

Guest Post: Swiss Miss

Guest Post: Swiss Miss

Guest post by Rachel Carlin

The magical number 7:  a movie with Brad Pitt; a trying time for relationships, and of course the time frame Jesuit priests need to make the boy a man.  This is also the length of time I had not returned to Geneva: place where I found my passion (early childhood intervention), was very happy (Flanagan’s Pub and Shaker’s Nightclub) and learnt to cook (Faith O’Neill).

Faith not only taught me to cook, she taught me to love food. She taught me that a recipe book is often better reading than the latest bestseller. She taught me to look at a recipe and adapt it to the many needs and dietary requirements of a growing family. But, the most important thing she taught me was the best way to say “I love you” is in a dish. The dish has to be like the emotion itself: consistent, easily recognisable as such, and the culinary cuddle you need on a bad day. Faith and Paul (Mr. Faith) showed the ultimate love when they allowed me, not only to join in what was essentially theirs, but let it morph and grow to fit one more (as love should) and so shit pie became ours. Shit pie was served on bad days, sad days and glad days. Faith dished up shit pie to my backpacking baby brother and reduced him to tears. I will admit to trying to make it once, but failed dismally as it just wasn’t the same without the lashings of red (cue in Paul).

Some misconceptions about shit pie:

  1. It isn’t a pie
  2. And in the same line it contains no shit
  3. It is not the colour of shit

Rather, it was devised by the fantastic Faith (lawyer, mother, culinary expert and awesome lady) pre-kid days in London. Legend has it, Faith opened the kitchen cupboards and announced :”There is just shit here” and proceeded to create one of my favourite dishes ever. She made it TWICE for me in a 9 day visit (four of those nights she was State side), that is how awesome she is. So, without further ado, I give you Shit Pie for 4 (uncle Sticky joined us the last night)

Ingredients

1 tin anchovies

Healthy shake of mixed herbs

2 onions thinly sliced

1 garlic clove minced

2 tins tomatoes (ideally peeled and cubed)

2 tins tuna in brine

1 small tin black olives (not Greek) pitted and sliced

A handful of capers

A squirt of Tabasco

Basmati Rice to serve

Lashings of red wine (for 4 at least 6 to 8 bottles)

Method

In a frying pan, add the anchovies, with the oil and soften and then add the onions and garlic.

Next add the tomatoes and herbs.

Reduce. ( 5 to 7 minutes)

Shake on some Tabasco to taste and add tuna, olives and caper.

And yip you are done.

Serve with rice and lashings of red.

Perfection.

Turkish (or possibly Moroccan) chicken with saffron and almond couscous

Turkish (or possibly Moroccan) chicken with saffron and almond couscous

I have been back in beautiful, sunny SA for a few weeks now.  It is insanely lovely right now. Really. Like living in an HDR photo. Or maybe it’s just my new polarised sunglasses? Either way it’s crazy green and ridiculously blue and just gorgeous! I’m not sure whether to say I’m visiting, touring or home, because I’m not completely sure where we go next really. No wonder the gypsies were always a little miffed at the world. But I am loving it! My life feels a bit like an episode of the Amazing Race (a show I now realise I could never partake in as I would most certainly go postal when dealing with the airlines, will in all likelihood brain someone with one of those little posts used to contain the queues at an airport and then spend the rest of my life in jail. Also, at 35 years old I have been informed by my father that with my back I may not horse ride or go-cart, so there goes half the challenges too.). We spent a few days in the Kruger Park (more on that later) and are now lazing next to the banks of the the Vaal with G&T’s whilst feeding the fish using rods. There has been little time for blogging. And when there has been, I have preferred to use it to read – Kaalkop by Nataniël to be precise so at least I am getting my foodie fix in. Do yourself the favour. Anyhoo, to make up for the lack of posts, herewith a recipe for chicken that my mom made on my last visit home. The original recipe is from the Lifestyle magazine in the Sunday Times but as I was so busy nattering and gulping down ice cold bubbly, I took no notice of what she did really. So I had to sort of chuck in the flavours I remember. The recipe called for a whole chicken stuffed with couscous and took hours to make. This one is done in a jiffy and with drumsticks. It is therefore probably not remotely the same thing, but is a close enough approximation none the less!

Serves 4

Ingredients

2 medium onions, chopped

3 tablespoons oil

3 cloves of garlic, crushed

1/2 cup of raisins or sultanas

1kg chicken pieces

1 teaspoon cinnamon

1 teaspoon coriander

1 teaspoon cumin

1/2 teaspoon turmeric

125ml chicken broth

2 or 3 tablespoons honey, depending on how sweet you like it

a few saffron threads, steeped in 2 tablespoons of hot water (essential! treat yourself!)

couscous for 4

half a cup of whole almonds, halved

1) Heat 2 tablespoons of the oil in a pan. Season the onions with salt and pepper and slowly saute until translucent and just, just heading towards a pale golden colour. Add the garlic and cook for another two or three minutes.

2)Transfer to an ovenproof dish big enough to hold the onions and all your chicken. Scatter the raisins over the onions.

3) In the same pan, brown the chicken pieces and place on top of the onions and raisins. Deglaze the pan with a little water and add the juices to the dish.

4) Add the remaining oil to the pan and turn the heat down a little. Add the spices and fry until they start releasing their fragrance. Hum a Bollywood tune. Add the broth, honey and saffron, heat for a minute or two more and pour over the chicken. Bake at 180ºC for 1 hour.

5) Prepare the couscous as per the packet instructions (use a bit of chicken broth instead of just water), stir in the almonds and serve with the chicken. The almonds add a beautiful texture to the dish that I have become totally addicted to!

“Pap & Wors”

“Pap & Wors”

What is it about boerewors that makes it one of the first things South Africans abroad would list when asked what they miss most about home? Like maple syrup, mushy peas and rice noodles, this coriander spiced sausage is one of those dishes that evokes instant images of a nation while simultaneously getting a “meh” from the rest of the world. But for us, boerewors is short winters and long summers, relaxed braais in the sunshine, friends around a fire, cheering for the Boks (or lately, crying together about them) and tapping our feet to “Spirit of the great heart” playing on a loop in our heads. It’s on our whittled down list of 100 reasons why we stay despite the crooks, crime and corruption. Like Africa, it’s in my blood and impossible to forget when I leave it behind. And weirdly, when I am away from home I even start missing things I never even liked at home! Like pap tert. I can’t stand pap tert. But suddenly I really, really wanted pap tert & wors. In China. Needless to say, it’s not big there. But I could easily get everything I needed to create a close approximation without having to try and explain  pig intestines to the butcher. That would’ve been fun. This was the result: A kind of posher version of pap en wors (or at least as posh as meatballs can be). Our Tanzanian correspondent believes that this dish is an abomination. Pap should always be pap and should not be poshed up. I can only think of two reasons why she feels this way: a) she hasn’t tried it and b) her mother’s pap lasagne has ruined fusion South African cuisine for her forever. If it helps, then think of it as meatballs and cornbread. Better now, isn’t it? When done this way, the cornbread is very light and crumbly and the bottom bit soaks up the tomato and onion sauce. It’s like krummel pap en sous and that lovely little crunchy bit you get at the bottom of a pot of mieliepap that everyone fights over at the end of a meal! Personally, I thought it was genius.

Serves 4 with ease

Ingredients:

For the Ishibo (tomato and onion sauce)

If you can get your hands on a tin of Ishibo then, well, then you’re probably in SA and your car is being stolen from the supermarket parking lot. But chin up because at least you don’t have to chop up onions! If you don’t have Ishibo, fry a chopped onion until translucent, add a tin of chopped tomatoes, salt and pepper and simmer for thirty minutes. If the mixture become too dry, just add a little water. Set aside.

For the sausage mixture:

If you have boerewors, just remove the meat from the sausage casings and shape into meatballs. Otherwise, read on.

750g beef (“beef” is pretty much what we can get in Qingpu, but a well matured chunk would be better)
350g fatty pork
20ml ground coriander, or more to taste – this is what puts the boer in boerewors
10ml salt
a bit of black pepper
5ml brown sugar
45ml dark vinegar (I used Zhenjian aromatic vinegar, but brown spirit vinegar would be perfect)

2 tablespoons oil

Directions:

1) In a food processor, mince the beef and pork. Don’t make it too fine – a bit of texture is good.

2) Combine the meat and the rest of the sausage ingredients well and shape into meatballs slightly bigger than golf balls.

3) Brown the meatballs in the oil and place in a single layer in a baking dish. Squish if necessary. Pour over the tomato sauce. This can be done ahead of time and the whole lot stuck in the fridge till you’re ready to bake the bread.

For the corn bread:

(This recipe doesn’t make the type of cornbread needed to satisfy the average Paula Deen fan. It’s more like a crumbly, extremely generously proportioned crust.)

80 ml butter, melted

2 tablespoons sugar

2 eggs

3/4 cup (190ml) flour

3/4 cup (190ml) yellow cornmeal (In China, find it in the aisle with the dried vegetables and legumes. It’s grittier than regular cornmeal, but in my opinion that improves the texture of this dish. Don’t get something too fine, as your bread will be too dense.)

2 heaped teaspoons baking powder

2ml salt

100 milk

Directions

1) Preheat oven to 180ºC.

2) Beat together the butter and sugar and add the eggs one at a time. Sift together the flour and baking powder and add the cornmeal and salt.

3) Combine the egg mixture, flour mixture and milk and stir to create a thick, but pourable batter.

4) Pour the batter over the meatballs and bake until golden brown and a toothpick inserted in the center comes out clean. 35 minutes or so.

Pour yourself a glass of wine, eat up and think of home! Meanwhile, that’s exactly where I am, so I’ll be having a bit of the real thing for lunch!

Guest Post: The good girl’s guide to chicken livers.

Guest Post: The good girl’s guide to chicken livers.

By Rachel Carlin

It turns out Pringles are not the only thing that once you pop you can’t stop. Since popping my cherry, every time I so much as make a slice of toast, I am talking myself through it and seeing the process in print. As I firmly believe life is too short to ever eat bad food, or drink instant coffee for that matter, this “what will I blog next” question has taken over my life.

Living in the tropics, with manly man frequently off assembling big manly equipment, I am usually in the position to have chick food. This is not the corn and grain variety, or questionable substances if the sources of anti-battery farming are to be believed, but rather girly food, essentially salad. I am not one of these girls who has bought into the no carb after stupid o’clock diet. I have also never bought into one lettuce leaf and a murmur of carrot salad. So, I created THE SALAD OF CHAMPIONS.

A quick side note. My mobile phone provider gives 200, yes two hundred, free local texts a day. Texting is my communication mode. I seldom require a reply and have been known to reach close to 200 LOCAL texts in a day (this excludes bbm’s, whatsapp messages and international texts). Did I mention I run my own business?

So, due to this texting habit, I know what all my friends are having for dinner every night. And I am a bit competitive so I like to believe, even if it’s just in my head, that I am winning. It is sometimes challenging to remain loyal to TSOC, but I do. My dearest friend and next door neighbour was having chicken livers for dinner and coincidentally so was I. Sadly I knew hers would be the yummy restaurant variety with the cream and rich sauce lovingly mopped up with chapattis. Mine unfortunately would be the healthy variety, ten days until my trip to Switzerland and trying to store up negative calories to use on cheese fondue and hot chocolate being the driving force.

So here goes:

Chicken livers for good girls

2 garlic cloves minced.

1 onion thinly sliced

1 250g punnet of chicken livers washed, cut into the same size pieces (so they all cook at the same rate) and any bits that don’t look like liver removed. This is particularly icky, I find playing cheesy 80’s rock at full volume and singing along makes this a lot more tolerable.

½ cup of white wine – I have finally become an adult and will not drink bad wine. I froze, yes froze, not inhaled, wine I wouldn’t drink brought to a party and used that. I am still not convinced of the whole “do not cook with wine you wouldn’t drink” movement. Basically when you cook with wine, the alcohol burns off and yes, you are left with some toxins, but surely you eat some E numbers now and again. The beauty of cooking with wine is it is fat free, no need for butter or oil, and even olive oil, is still oil and using up the not good stuff means there is more of the good stuff left to enjoy the way it was intended. Cheers!

1 tablespoon of red chilli paste or if you are a martyr, finally slice a red chilli and remember not to touch your face.

A nice handful of parsley finely sliced

Salt and pepper to taste.

SO:

Pour the wine into the pan and bring to a gentle boil.

Add the garlic and onions: sadly these won’t caramelise due to lack of fat, but pour another glass of wine and enjoy calories spent elsewhere.

Once softened (roughly 3 minutes) add the livers and let them do their thing.

Add the chilli and a good grind of salt and pepper.

Let this simmer along nicely and assemble the salad.

I go for red pepper, yellow pepper, cucumber, cherry tomatoes and a mixed lettuce bag. Toss them all up, dress if you must and add a carb. Couscous is a great one, as is just cooked baby potatoes which was tonight’s carb of choice.

Add the parsley to the livers. Pour yourself another glass of wine and toast the magnificence that is you cooking with fresh herbs! I firmly believe in celebrating all of life’s small victories.Pour over the livers, for one you only need 1/3 and the rest is freezer friendly for a Sunday breakfast when manly man is back. Served on toast with poached eggs and large Bloody Mary’s, but more on that next time.

Homemade granola

Homemade granola

Breakfast is a bit of a challenge in China if you’re not near a shop that sells expat goods. You can get the odd cereal, but they’re more into congee and noodles with their morning cuppa. Lucky for you, you’re a thrifty little homemaker, and all the ingredients to make your own granola are readily available. And you don’t need to be Martha Stewart to make this either. It takes all of 5 minutes to prepare, and then just let the oven do the rest!

Homemade granola

Makes 3 cups

Ingredients

2 1/2 cups raw oats

pinch of salt

1 teaspoon cinnamon (or to taste)

1/2 cup of nuts (I used almonds)

2 tablespoons butter

1 tablespoon sunflower oil

5 tablespoons honey

Method

1) Preheat the oven to 100ºC. (If you’re using a little toaster oven, which if you’re a temporary citizen you probably are, make it 120. Don’t be impatient and set it too high or you’ll burn the nuts. You don’t want burnt nuts). Scatter the oats in a baking tray. Sprinkle with the salt, cinnamon and nuts and stir through.

2) In a little bowl, melt the butter and add the oil and honey. Pour over the oats.

3) Stir the honey mixture into the oats. This is about the minimum amount of mixture you would need to get good coverage without it getting to fatty or sweet. Yes, I realise there is no such thing as “TOO fatty or sweet”, but it’s breakfast, so let’s try to start the day right, okay?  It won’t look like enough in the beginning, but just keep stirring till it’s all coated and trust that it is enough. If you want more butter and honey, add as much as you like.

4) Place in the oven and toast until golden brown and crunchy, about 90 minutes, stirring occasionally.

Homemade hamburger buns

Homemade hamburger buns

You know how sometimes you need a hug from that one person? Not just any person. A specific person. It seems in that moment like it’s the only thing that will make you feel better. You might get a hundred hugs from other people, but it just isn’t the comfort and snugglyness you are looking for and it just feels a bit, well, flat really. Well I feel the same way about hamburger buns. I’m very particular, and when I’m craving a soft, squishy, yeasty bun nothing else will do. Now as any red-blooded bread-o-phile will know, indulging our particular passion in China is easier said than done. The Chinese like their bread on the sweet and cakey side and even though a growing number of patisseries are now starting to cater for those who like a more chewy, yeasty bread, they normally take the form of baguettes or ciabattas. Hamburger and hot dog buns are still a rarity. Fortunately, you can find everything you need for baking your own rolls at most supermarkets. If, like me, you have given up on finding yeast, fear not! I found it in the aisle next to the peanut butter and mayo. Go figure.

This recipe makes the perfect hamburger bun. To my taste anyway. Like that essential hug they are firm with just the right amount of give to make them squishy, they smell wonderful and they aren’t crusty. Erm. Okay, the similarity probably ended with smelling lovely. This recipe was shamelessly copied from Serious Eats, without changing a thing (other than replacing the dry milk with 4 heaped tablespoons of Cremora as I did not have milk powder on hand). For these burgers I made a few pure beef patties, a creamy basil pesto sauce and some mixed root vegetable fries. Who says money can’t buy happiness?

Makes 12

Ingredients

  • 1 1/2 cups warm water (37°C)
  • 2/3 cup instant nonfat dry milk
  • 1/3 cup melted butter, cooled
  • 3 tablespoons sugar
  • one package of active dry yeast
  • 1 large egg
  • 2 large egg yolks
  • 5 cups all-purpose flour, plus more for dusting
  • 1 1/2 teaspoons salt
  • oil, for bowl
  • 2 tablespoons milk

Method

1)      Place the warm water, dry milk, butter, and sugar in a large mixing bowl, and stir to combine. Sprinkle the yeast over the mixture, whisk, and let stand until yeast is foamy, about 10 minutes.

2)      Add egg, 1 egg yolk, 2 cups flour and salt. Whisk until smooth. Add 2 1/2 cups flour and stir with a wooden spoon. When mixture becomes too thick to stir, use your hands. Add up to another 1/2 cup flour until dough is tacky when pinched but not sticky. Turn out onto a lightly floured work surface and knead for a few minutes. Let stand 10 minutes.

3)      Knead dough again until smooth and elastic, about 5 minutes. Place in a lightly oiled bowl and cover with plastic wrap. Leave in a warm place until doubled in size, about 45 minutes. Punch down dough and divide in half. Cut each half into sixths and form flattened balls. Arrange buns 3 inches apart on oiled baking sheets. Cover and let stand until doubled in size, about 45 minutes.

4)      Preheat the oven to 200°C. Whisk remaining egg yolk and milk and brush egg wash lightly over buns. Bake until golden and hollow sounding when tapped, 13 to 15 minutes. Cool on a wire rack.

On hairy crabs: My dismal failure

On hairy crabs: My dismal failure

I was going to do it. I really, really was. Last night was the night I was going to buy, render unconscious and cook the flavour of the month: shanghai hairy crabs. These burrowing crabs, also known as mitten crabs, are so named for their furry claws that look like mittens. Come Autumn, these crabs hit the streets. Not in their finest gear, ready to party the night away, but fighting for space in green nylon bags in every smelly wet market and on various street corners throughout the city. People get totally crab bedonderd round about now. And naturally, I had to partake in the festivities! Live like the natives and all. So yesterday, full of bravado, I headed for the wet market ready to hunt down and bring home all the makings of a fine Shanghai meal. Well. If the first thing out of your mouth when you see your dinner is “Awwwwwww”, you know it’s probably going to be McDonald’s for you. I mean, they’re just so cute! They really look like little green alien babies, trying to keep their claws warm in little furry mittens. Once a crab has the dubious honour of being selected as chow, the stall (2 polystyrene coolers and maybe a scale) holder deftly grabs it out of the bag, folds in the legs and binds the whole thing with twine so that it can’t make a quick getaway. The entire process takes all of 5 seconds. I asked the friendly, elegantly dressed customer next to me how much they cost and she said RMB6 for one. (At least, I think that’s what she said? It was either that or “Sharp, my bru”, the hand signal for which is the same as 6 in China). That’s less than a dollar a crab. Damn, that’s cheap! They’re looking tastier already. And a local had told me the price, so there would be no laowai tax imposed. Being ripped off was another concern. (I am the world’s worst haggler. Once, in a market in Bangkok, I had already “negotiated” the price for a dress and upon handing the money over, the guy actually gave me a few baht back with a pitying look on his face!). But that was now taken care of. There really were no more excuses left, so it was time to choose which crabs I wanted. Now, here stories will differ depending on who you ask. The other customer would say it is all my imagination and she didn’t see a thing, but I swear, the first crab I picked up looked up at me with dark, sad eyes (just like Puss-in-Boots if his eyes had been on stalks), and it’s lower lip started quivering, tiny bubbles frothing out of it’s mouth like a death rattle. A tiny, furry claw reached out to me as if to gently touch my cheek, and I swear I could hear a little chorus of voices pleading “You are our only hope.” I gently placed the crab back where I found it, muttered something about it still being a long way to Qingpu, and shuffled off with my tail between my legs.

Fortunately, there’s a McDonald’s right at the bus stop on my way home.

But no worries! I awoke with new gusto this morning. A steadfast determination to make these crabs my bitch. The way I figured it was thus: The sooner I ensure the untimely demise of 6 of these crustaceans, the sooner I will be relieving them of their misery. Right? I mean, at least they won’t land up in a live hairy crab vending machine, destined to wait it out in a 5 degree fridge till someone with a few yuan comes along and pulls the lever, right? Right. This would be a good thing. I would be doing my share to make the world a better place. I decided that instead of braving the sad faces in the wet market, I would head to my nearest supermarket. Here the crab is kept cold, so they’re already in a state of semi-hibernation, and so would be less likely to make a last stand. Sure enough, hairy crab was the first thing I saw as I got to the fish counter. (It was also almost four times the price for the same size as the previous day’s leading me to wonder whether the helpful shopper really was just saying “Sharp my bru.”). Already trussed up and nestled in still rows on a bed of ice, it was easy to tell myself they were already dead. All I had to do was see who the little boys are and who the little girls are to ensure I get three of each. You see, the battle of the crab sexes is a hotly debated topic in Shanghai, with long arguments over decimated piles of crab over which sex has the sweetest meat and richest roe. The females usually win out, but I had to try for myself. So, all self congratulatory because I know to look for these differences before making my purchase, I picked up a crab and flipped it over… The crab was not dead. It was not even sleeping. Two little black eyes stared up at me as a wayward leg came loose from the twine. Flailing it’s furry mitten around wildly the little chap (or chick, I didn’t even get a chance to look) shouted “She’s saved me! I’m free!” before it tried to air swim away. Okay, not really. But it might as well have for how it made me feel like I’m the world’s worst human being, single-handedly responsible for the sad depletion of our oceans. I tucked the little leg back in the twine, put him back on his ice bed while muttering an apology to him, his brethren and their lady friends, and slunk off to the butchery.

So I am left shamefacedly writing this post, drowning my sorrows in a glass of whiskey while my husband cooks the neatly packaged pork rashers I bought as a substitute. I guess drunken shrimp is off the menu then.

Guest Post: A Trifling Matter in Tanzania

Guest Post: A Trifling Matter in Tanzania

When my favourite married-on girl cousin in all the world told me she was making a trifle with what she considered to be a jelly flop (a recipe gone wrong, not a chubby person diving), I said she should write down the process and guest blog for me. She is, after all, everything I am failing miserably to be: A strong, independent woman who packed it all up, headed north into Africa and started her own school in Dar es Salaam (to date, I have only ticked off the “packed it all up” bit). And she’s a fabulous cook. If that is not an expat surviving in a foreign country (and doing it well) then I don’t know what is! For that braveness alone, she is my hero. What a joy to wake this morning and find this in my inbox!

By Rachel Carlin

It started when I started my own business. It all became too much. I needed something to take my mind off the gazillion things I had not completed in the 24 short hours in a day. Everyone needs a release, a vice, something that takes the edge off. I turned to baking. Living and loving it in Dar es Salaam, baking was not the obvious choice of emotional release as most ingredients needed are imported and so are 3 times the cost of what they are back home and there is not a constant supply of ingredients. Still, I figured this was a cheaper option than developing a crack habit.

The other problem is I live alone and like any mid thirty year old woman, I watch what I eat and I also do not have a wild love for confectionery so not only do I bake but then I hand out the baked good. I like to think of myself as Robin Hood meets Delia Smith. The only problem is everyone knows my baking is associated with some emotional melt down and the more elaborate the dish, the bigger the melt down. My neighbour now greets my arrival with baked goods with an “Oh no, what now?”.

This week’s culinary adventure was not brought on by an emotional breakdown. It was inspired by two simple facts: a bottle of pink JC le Roux I was unsure what to do with as cannot drink it, and a man returning from a trip of doing manly things and needing some bed bait.

The obvious choice for the pink bubbly was champagne jelly. I have never tasted this and could not understand how it works. For a smart, post graduate educated woman, I can be surprisingly dumb. I somehow thought the jelly would contain the bubbles. How or why I thought this, I do not know, but in case there are others like me, let me just clear it up, it doesn’t. I also referred to Anthony Worral Thompson’s recipe on the BBC food website. Silly for two reasons: Reason 1:  Wozza has been caught shop lifting due to the recession and is clearly not the way forward and reason 2: as my favourite food critic told me it was a rookie mistake to make a dessert listed as “low fat”. But I did and I made it and was disappointed. Instead of the melt in the mouth bubbly light (and low fat) dessert I had hoped for,  I ended up with ming. The taste resembled a stew that had the red wine added too late, so an overpowering taste of raw alcohol and nothing else. But there was no meat taste, thank heavens.

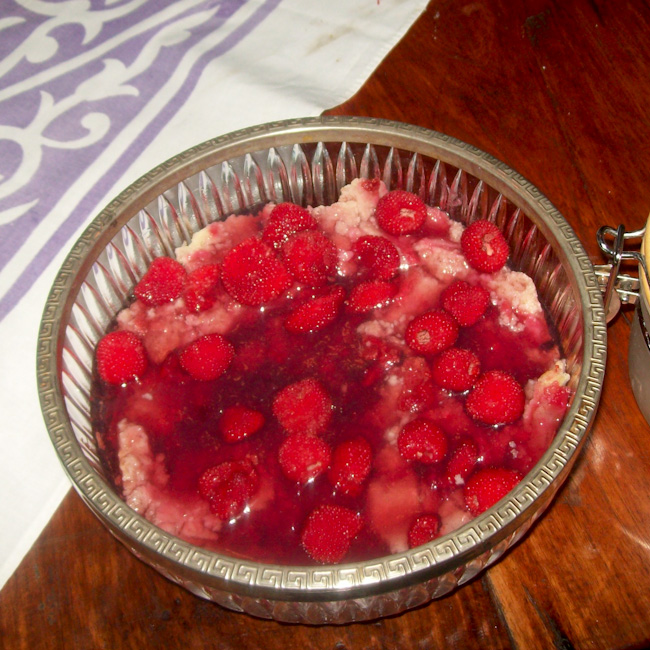
I unfortunately believe in throwing good money after bad and as I did not know what to do with this quivering thigh resembling thing in my fridge I thought, hmmm, why not make a trifle. Disguise it as something else and others would be tricked. Only problem, I hate trifle. The components are from the nursery, and assembling baby food and calling it a dessert is a shameful cop out. Also, I was unsure what to do with the finished product. Manly man missed various planes, trains and automobiles, so was not going to be here for this delight. Trifle is not fence sitting material. You either love it (I ended a relationship due to his love of this gloop, and my mother’s version at that) or hate it due to a refined palate. But making it is fun, especially if you are an over-achieving, middle child, attention seeker. And being me, I decided the challenge would be (ming) trifle from scratch.

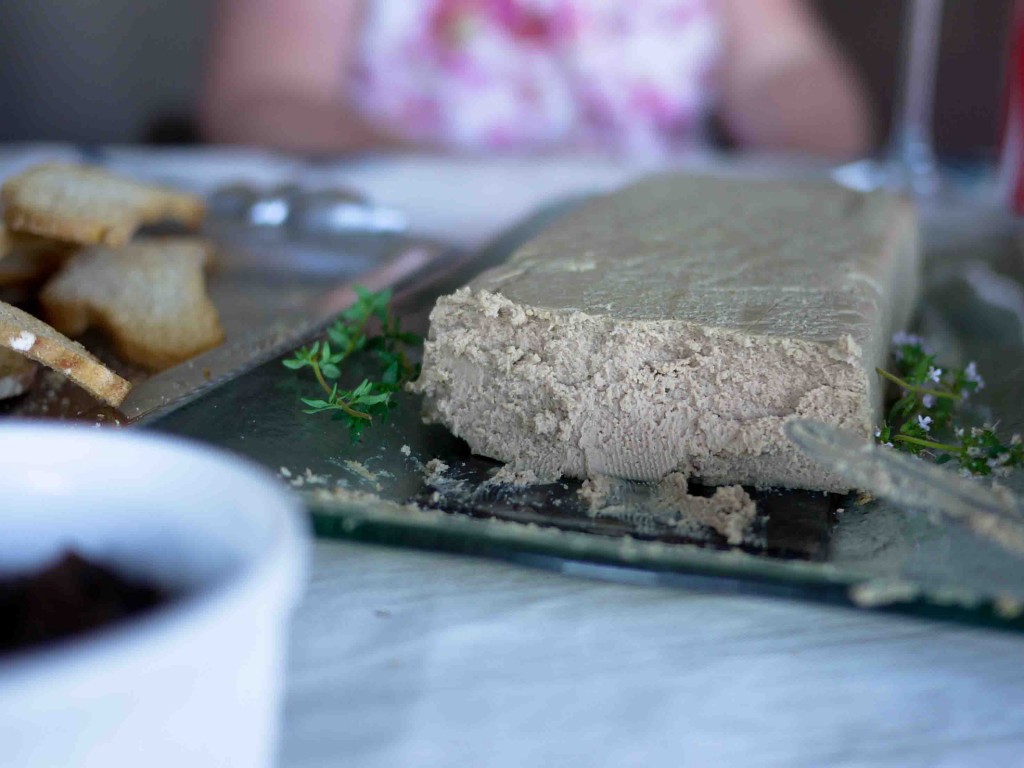
I am also a shameless culinary name dropper and will always say it is Jamie’s soup or Delia’s pâté or Nigella’s butter laden, cardiac arrest causing risotto. In my head we are all on first name terms. So, I obviously use AWT’s champage jelly, Jamie’s Victoria sponge (only made half the recipe) and the River Cafe crème anglaise and then assembled. Whipped cream on the top was all my own.

I have dispatched this piece de resistance to the Little Theatre where (other) manly men are building the set of We Will Rock  You, the musical. They might not be the connoisseurs I was hoping for, or the thank you from my manly man I was hoping for, but they appreciate anything, being manly men, and my concoction has found a happy home.

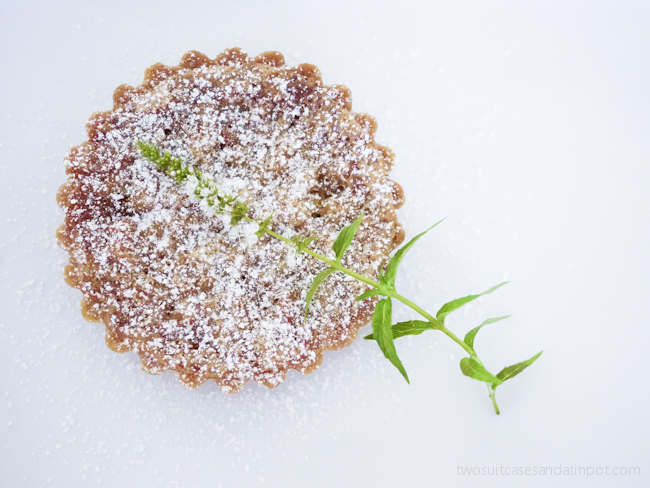
To make the pink champagne jelly trifle

Where it began: Pink champagne jelly

1) Soak 6 leaves of gelatine in cold water for 5 minutes.

2) Open the bottle of pink bubbles and pour into a large freezer proof bowl. If you are so inclined, by all means have a glass and toast your own fabulousness.

3) Add 100g of caster sugar, again not an exact science, more if you like it sweeter, ummm less if you don’t.

4) After 5 minutes, squeeze the gelatine leaves, place in a small pan and heat gently with a bit of the bubbly until completely melted.

5) Add some more of the bubbly to the pan, a fair amount to get all the gelatine absorbed and back to room temperature. This step is important because if you pour the melted gelatine straight into the cold or even room temperature liquid it will become a small horrid mass that you can’t do anything with. This learning curve happened about a year ago.

6) Place in the fridge and allow to set. Depending on your fridge and the quality of gelatine, I would safely say overnight, but perhaps you could have it set in 4 – 6 hours.

7) Once you are ready for the trifle, prepare half a batch of Jamie’s Classic Victorian Sponge. Bake and allow to cool.

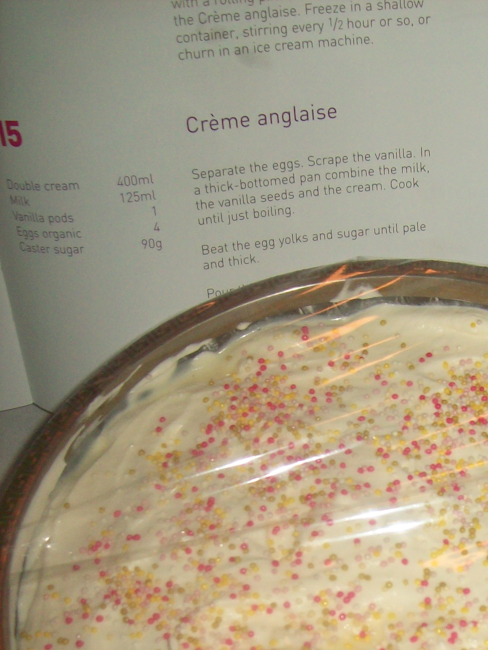
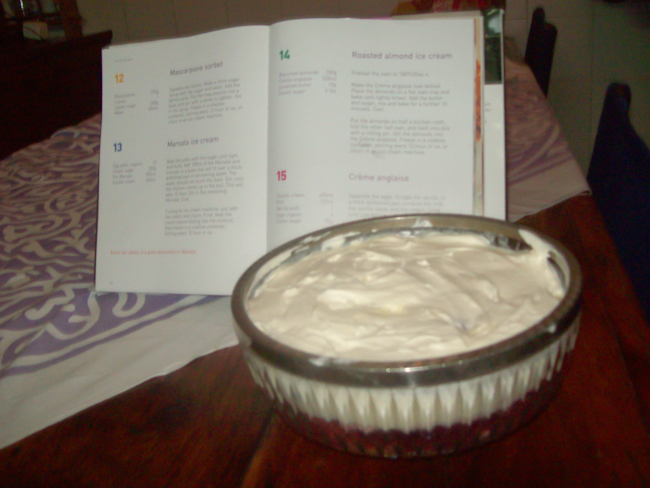
8) Next make River Café’s crème anglaise:

400ml Double cream
125ml Milk
1 Vanilla pod
4 Eggs, organic
90g Caster sugar

– Separate the eggs.

– Cut the vanilla pod in half lengthways and scrape out the seeds.

– In a thick-bottomed pan, combine the milk, vanilla seeds and cream. Cook until just boiling.

– Beat the egg yolks and sugar until pale and thick.

– Pour the warm cream/milk slowly into the egg yolks and stir.

– Return to the saucepan and cook over low heat, stirring constantly.

– When it is almost at boiling point, remove from heat. If it boils, the sauce will curdle. Set aside to cool

In a serving bowl, layer the cake, jelly, some fresh raspberries and creme anglaise and top with fresh whipped cream.
*And interesting side line. I have never made creme anglaise custard before. I am also in the middle of my Jodi Picoult fest and the book I am currently reading is Handle with Care. The mother (because there is always a mother in these books) used to be a pastry chef. Each chapter starts with a baking technique explained. How fortuitous that the first technique was tempering which means to heat slowly and gradually. You temper eggs by adding hot liquids, a little at a time. This was a very important tip for me, as I would have tried to add the eggs to the milk, despite being told not to, just out of laziness. Also, I would not have done it slowly as I am impatient. Who would have thought, Jodi Picoult teaching more than moral dilemmas about children?

Creamy chicken pasta with basil pesto and (homemade) sundried tomatoes

Creamy chicken pasta with basil pesto and (homemade) sundried tomatoes

Necessity is most definitely the mother of invention. And when you live in China, but steadfastly insist on eating like you’re still back home, you have to get inventive pretty damn quick. Shanghai is an amazing city to live in. You can immerse yourself in Chinese culture, customs, life and food or you can go for days here without living in China. If you know where to look, you can get your hands on pretty much every comfort from home. But as Qingpu is the Western most district in Shanghai, getting a sudden craving for one of my favourite Verdicchio’s pastas could easily result in a three hour round trip to track down the ingredients. Take sun-dried tomatoes. They may be soooo 1990, but when no one is watching, we all still love them. But when I wanted to whip up this sun-dried tomato containing pasta a little while ago, I quickly realised that the Chinese are very à la mode, because I couldn’t find them anywhere. What to do? Even if I had a lovely, sunny patio, the searing temperatures and high humidity meant I’d be left with a scene more resembling a week old DB on CSI than anything you’d want to chop up with some chicken. So I settled for the next best thing – tomatoes completely untouched by the sun, but still oh so good. Possibly better, actually.

To make the oven dried tomatoes I halved about 750g of fairly large (for a cocktail) cocktail tomatoes, sprinkled them liberally with salt – about 1 tablespoon full – and placed them in a strainer for an hour so that any excess juices could be extracted. Then I arranged the tomatoes cut side up on an oven tray and left them in the fridge for a few hours to dry out further. (Overnight would be even better.) I then baked them in a 100ºC oven for three to four hours, until they had more than halved in size. I didn’t dry them till they were completely devoid of any moisture. Instead, I stopped when they were still slightly plump. More like a sun-blushed tomato (and therefor once again fashionable). And oh, my, word. They were fabulous! So much flavour and none of those icky chewy bits you get in bags of sun-dried tomatoes. Keep in mind that because these tomatoes aren’t completely dried out, they need to be refrigerated and will last for up to a week. But they freeze like a dream too.

Once I had my tomatoes sorted I could make my chicken pasta with sundried tomatoes and basil pesto.

1) Slice two chicken breasts into strips, dust with seasoned flour and brown in a bit of oil till almost done, but still slightly pink.

2) Add two cloves of crushed garlic and stir through for a minute. Glug in a bit of white wine if you have on hand, but don’t worry if you don’t.

3) Pour in 200ml cream.

3) Add about three quarters of a cup of sundried tomatoes (less if you’re using very dehydrated ones), roughly chopped, and 3 heaped tablespoons of basil pesto. Allow to simmer till slightly thickened, adjust seasoning and serve tossed with penne or your favourite pasta. Loads of flavour with minimum effort. This sauce goes particularly well with gnocchi.

Oven dried tomatoes: Before and after.

My food photography has been really shite of late. Fluorescent hotel lighting, tiny Chinese plates bought from an alley shop and laminated table tops sans props do not make for good food styling opportunities. My husband has suggested trying something completely different. Like balancing a plate of food on a Pilates ball (or my head) for interest. While I don’t want to knock down any of his ideas, I think I’ll just stick to crappy shots of badly lit food. At least you get the idea, right?

Sichuan Style Braised Eggplant

Sichuan Style Braised Eggplant

I have been trying to diet. Really I have. But after one week, the only thing I have managed to lose is my sense of humour. It might be so that 25 is the new 35,  but my face didn’t get the memo and neither did my body.  To be fair, I was warned about this by those older and wiser than me: When you hit 35, things will go a bit pear shaped. Or, more accurately, apple shaped. The answer to “Where did my twenties go?” is indeed “Straight to your muffin top, dearie”. But I didn’t really believe them. How do you go from one shape to the next overnight? And yet it seems like that is exactly what happened. One minute I was worrying about how best to hide my saddle bags and the next thing I knew I had a fanny pack I had to camouflage. Of course it doesn’t help that I have a few things conspiring against me: Firstly, there is limited height into which I can fit any excess weight. Secondly, I have bad knees and a bad back which means many exercises are verboten. (I am possibly the only person in the history of the world who, as a little girl, had to face the humility of failing grade 1 ballet because my teacher, Miss Hazel, didn’t think my legs could handle moving to grade 2 yet. I don’t think “loser” adequately conveys the extent to which you are a sporting failure if you can’t pass first grade ballet!) And lastly – and here is the clincher, possibly exacerbating all of the above – I don’t like veggies. At least, not the type of veggies that are good for you in any way. Caramelised in butter and sugar like the Afrikaners like to do them? Sure! Drenched in a creamy, cheesy sauce? Sure! Steamed and healthy? Not so much. So it came as quite a surprise to me when I thoroughly enjoyed a plate of braised aubergines on a trip to Zhujiajiao recently. Granted, in one dish there is probably more sugar than in a Twinkie and more salt than in John McEnroe’s headband, but at least it’s a vegetable and it’s low in fat. The problem with eating anything in China worth writing about though, is that the recipe of said dish has inevitably been passed down from generation to generation and is a secret guarded more closely than the identity of the Stig. Of course that means that I simply have to wait for a disgruntled ex-employee to spill the beans in an otherwise boring book, or I could consult the world’s greatest oracle. So to Google we go! This recipe has been adapted from www.seriouseats.com. Bland veggies like aubergine and courgettes work well to absorb the flavoursome sauce, but it would work just as well with peppers and onions.

Sichuan Style Braised Eggplant

Serves 4

750g aubergine

1/4 cup Shaoxing rice wine (I felt a bit lost in front of the rows and rows of rice wine in the shop, so eventually settled for the prettiest bottle, which turned out to be green plum wine. Oops. If you can’t get your hands on Shaoxing wine, you can use Japanese sake or dry sherry or even dry white wine. When using the latter, add a little more sugar during the cooking process.

1 heaped tablespoon of Sichuan fermented chilli-bean paste (It’s a lot yummier than it sounds! If you can’t get your hands on it, use equal parts sweet chilli sauce and hoisin sauce and reduce the sugar by half a teaspoon)

2 teaspoons flour

3/4 cup chicken stock (or substitute with mushroom or veggie stock)

2 tablespoons dark mushroom soy sauce (I love the almost cloying richness of mushroom soy sauce, but you can substitute with 3 tablespoons of regular soy sauce)

2 tablespoons of Zhenjian aromatic vinegar (substitute with equal parts Balsamic and white wine vinegar)

2 tablespoons of sugar

2 tablespoons of ginger, finely chopped

3 cloves garlic, finely chopped

4 spring onions, sliced and whites and greens kept seperate

2 tablespoons vegetable oil

1) Slice the veggies into battons, roughly 2 x 2 x 6cm’s. Steam the pieces in a bamboo steamer (or pot) until tender, about 15 minutes.

2) Combine the Shaoxing wine and flour in a medium bowl and whisk. Add the stock, bean paste, soy sauce, vinegar, and sugar and whisk to combine. Combine ginger, garlic, spring onion whites, and chilies in a small bowl.

3) Heat  the oil in a wok over medium heat. Add the ginger mixture and stir fry until aromatic. (At this point I like to switch the heat off for a minute and just sniff the heavenly aroma of garlic and ginger cooking together. But I can be a bit weird, so don’t feel you need to do this.) Add eggplant and toss to combine. Add sauce mixture and bring to a boil. Reduce to a simmer and cook, stirring occasionally, until the sauce thickens, about 10 minutes. Stir in the spring onions, and serve immediately. Serve with fluffy rice to soak up all the sauce.

Green plum wine – too pretty to ignore.

Vietnamese Spring Rolls

Vietnamese Spring Rolls

Anyone who has ever had the success rate with rice paper wrappers that I used to have has probably already navigated away from the page in total disgust, trying to erase the nightmarish visions of gloopy sheets of glutinous slop sticking to the bottom of the pan, the side of the pan, the slotted spoon in the pan and everything else within a 3 meter radius. The end result of trying to make anything with rice paper is usually a pitiful little clump of oil logged veggies with a shredded piece of wrapper stuck pathetically to one end, clinging on for dear life like a snotty tissue. Enter the chef on board one of the Bhaya Cruises vessels to clear up all the confusion in a cooking class on deck. What I thought was revelation shining down on me in amber hued rays as we cruised around Hulong Bay in Vietnam turned out to be just a break in the passing storm cloud, but the discovery was no less eye opening. Why, why, why has everyone always said you must dip the wrappers in a bowl of water? Worst. Idea. Ever. Unless you like having sticky bits of rice paper stuck to your plates, working surfaces, fingers and eyebrows. No. The secret is to place the rice paper wrapper on a wet tea towel and just pat it lightly. It should be just soft enough to become pliable without ever becoming sticky. Once you have the knack of it, the rolls can either be deep fried in oil or you can serve as is. If you choose the latter option, serve a dipping sauce with the rolls to make them softer and easier to eat. These have been claimed to be the best spring rolls ever made. The claimants were my friends, but don’t let that diminish their observational powers for you.

Deep Fried Spring Rolls (Nem Rán or Chă Giò)

Serves 5

Ingredients:

60g vermicelli (glass noodles)

100g lean ground pork, prawns or a combination of both (omit for a vegetarian option or add cubed tofu)

4 pieces of wood fungus, soaked and finely chopped (this is not really available at your average supermarket, so if you’re not going down to the woods today then stay at home and use one large, black mushroom fried in a little butter till done)

1 large egg, lightly beaten (omit if you won’t be frying the spring rolls)

2 spring onions, finely chopped

1 carrot, grated

2/3 cup of cabbage and onion mix (Okay, this wasn’t in the original recipe at all, but I really like cabbage in spring rolls. Besides which, if you’ve come here for light and refreshing meals you’ve come to the wrong place. To make the mix I chop up about half a head of white cabbage and one or two onions and fry slowly until caramelised. The leftovers are great spiced up with a bit of curry powder and added to lentils and brown rice. (There you go. That’s my healthy tip for the day.) I would leave this out if you aren’t going to fry them.)

1/2 teaspoon of salt

a twist or two of black pepper

1 tablespoon of sesame oil. This is absolutely essential!! Do not, under any circumstances, leave it out. Unless, of course, you are deathly allergic to sesame seeds and it will kill you.

24 sheets of rice paper

2 cups oil for frying

Dipping sauce (nước mắm):

3 fresh red chillies, finely chopped

3 cloves garlic, crushed

a handful of roasted peanuts, crushed

1/4 cup caster sugar

3 tablespoons fresh lime juice

3 tablespoons fish sauce

3 tablespoons water

Combine all the ingredients in a dipping bowl and stir.

Method

1) Soak the vermicelli in boiling water for 5 minutes to soften. Drain and cut more or less in half.

2) Combine the noodles, egg, pork, mushroom, spring onions, carrot and cabbage and season. Add the sesame oil.

3) At this point, ignore whatever any recipe using rice paper says (even if you have those really thick, hard rice paper wrappers). Just take a clean tea towel and wet it thoroughly. Place each piece of rice paper on the tea towel and press down until you feel it becoming slightly more pliable. Place a tablespoon full of filling in the center of the wrapper. Fold in the sides and roll up tightly. Wet the last edge with a bit of water and stick it down.

4) Heat the oil over moderate heat and fry the spring rolls till golden and crispy, turning them several times. Drain on a paper towel and serve with the dipping sauce or a bit of soy and some sweet chilli.

Fusion Fajitas

Fusion Fajitas

Every now and then I experience a truly miraculous foodie moment. An instant when I know my culinary world has shifted and life will never be the same again. Making our own corn tortillas last night was such a moment. It was a first attempt and by no means perfect, but oh my word! They are SO much better than the store bought variety! And infinitely better than making them with wheat flour. We eat a lot of wraps back home, but tortillas are hard to find in Shanghai and therefore, I would imagine, in the rest of China. The only place I have seen them is at City Shop (there’s one in the Shanghai Center in West Nanjing Road) and then it’s the packaged variety that comes with it’s own stay-fresh sachet and a long shelf life – never a good sign in a product that should only last a few days. They’re okay in a pinch, but not great. So we decided that if you can’t buy them, make them. To make corn tortillas you need a special type of corn flour called masa harina or harina de maiz and a Mexican friend. Okay, the Mexican friend is not, technically, required but it helps. When our rounds kept splitting on the edges our friend Tom recommended we add a bit of wheat flour to the mixture and it worked a treat! The process by which masa harina is made is very different from normal corn flour or maize meal which is why, if you have ever tried to make corn tortillas from normal maize meal, you’ll know it’s like trying to shape a bowl full of cheap playschool glue mixed with ground up bits of old rubber boots. Unlike normal maize meal that just gets sticky and gritty, masa harina makes a soft, pliable dough when mixed with water. We found a 2kg bag at City Shop for US$14.00.

Making the tortillas is dead easy. (Or at least, it would be with the right tools which, of course, we don’t have*). All you need is a heavy based cast iron pan, two sheets of wax paper and a rolling pin. We used cling film, the roll the cling film is wrapped around, a breadboard (for whacking) and a stainless steel pot.

– Mix together 1.5 cups of masa harina, 0.5 cup of wheat flour and one and a third cups of water.

– Once you’ve kneaded the flour and water into a soft, pliable dough, leave to rest for 30 minutes.

– Divide the  dough into 12 pieces and roll into balls.

– Place each ball between two sheets of wax paper (*cling film) and roll it into a 2mm thick round with a rolling pin (*whack it with the bread board till more or less flat and then finish off with the cling film roll).

– Cook in a hot pan for about 45 seconds per side et voila!

With a bit of practice they’ll be perfect and you’ll never buy tortillas again. It is also a fantastically social bit of cooking – each person trying to roll a better tortilla or come up with a better filling – and who couldn’t do with a little more of that? We started off with prawns, Ranch dressing and basil pesto, but as the evening progressed and we had more impromptu dinner guests, we added some beef and onions from Ajisen Ramen, peppers that Tom whipped up and a few pieces of processed cheese wedges. Fusion cooking at its “what do we have left in the fridge?” finest.

Remy’s Ratatouille

Remy’s Ratatouille

I don’t like veggies. At all. When Jessica Seinfeld appeared on Oprah with tips on how to get your kids to eat veggies, I was frantically taking notes. For myself. I eat them only because I have to and then grudgingly so. So I don’t know if it was with this energy that I went grocery shopping and whether the poor, shunned veggies could sense my reticence, but this recipe turned out disastrous. I don’t know why really, because despite not liking the ingredients in many other forms, I am rather partial to a good ratatouille. Which probably proves that veggies are not as intuitive as we might think they are. I have been eying the gorgeous, glossy Chinese aubergines (which are longer than regular aubergines) for some time now, and ratatouille seemed like the perfect way to try them out. I don’t know where I got this recipe from originally, but it’s supposed to be the recipe that Remy made in the movie Ratatouille. I don’t know whether that’s true (or as true as it can be, considering the claim is that an animated rat made a traditional French dish), but I do know that it’s a really good one, which is why it still tasted fantastic despite a slew of cockups. The first time I made them I did them in individual ramekins and unmoulded them to serve.

Ingredients

For the piperade (bottom layer):

1/2 red bell pepper, seeds and ribs removed
1/2 yellow bell pepper, seeds and ribs removed
1/2 orange bell pepper, seeds and ribs removed
2 tablespoons extra-virgin olive oil
1 teaspoon minced garlic
1/2 cup finely diced yellow onion
3 tomatoes (about 12 ounces total weight), peeled, seeded and finely diced, juices reserved

1 sprig fresh thyme
1 sprig flat-leaf parsley
1/2 bay leaf
salt

Remove all ingredients from the fridge. Read through the recipe and realise that it says cooking time is about 2 hours and you have 45 minutes before dinner is served. Pour yourself a large gin and tonic. Pop the one red, slightly shriveled (cause it’s been in the fridge for so long) pepper you have in the oven and grill until caramelised. Skin and chop finely. Fry the onions (two whole ones, because you now have to make up for all that pepper you don’t have) in the oil until it too is caramelised. Everything’s better when it’s caramelised. Add a tin of tomatoes (because you’re too lazy to peel and seed 3 measly tomatoes) to the pot. Realise the tin of tomatoes you thought you had is no longer there, so chop up three tomatoes, skin, seeds and all and add to the pot. Add the garlic which should’ve gone in ages ago, salt and bay leaf and leave to simmer.

For the Vegetables:

1 medium zucchini (4 to 5 ounces) sliced in 1/16-inch-thick rounds
1 Japanese eggplant (4 to 5 ounces) sliced into 1/16-inch-thick rounds
1 yellow (summer) squash (4 to 5 ounces) sliced into 1/16-inch-thick rounds
4 Roma tomatoes, sliced into 1/16-inch-thick rounds
1/2 teaspoon minced garlic
2 teaspoons extra-virgin olive oil
1/8 teaspoon fresh thyme leaves
Kosher salt and freshly ground black pepper

Slice the aubergine and zucchini into 3mm slices to just simmer in the sauce because you’re running out of time. Realise that the punnet of what you thought was zucchini is actually 5 cucumbers. And they’re not even the burpless kind. Damn your inability to read Chinese characters! Pour another G&T. Double the quantity of aubergine as you now have no zucchini. And you also forgot to get the squash. And you’ve used up the last of the tomatoes for the piperade, so there’s none of that either. Add the aubergine and thyme to the pot and simmer slowly for about an hour. Serve with ricotta gnocchi fried in a little butter till golden. I haven’t even bothered including the recipe here, because ricotta is not easy to find in China and I didn’t think it was all that much better than good old potato gnocchi anyway.

For the Vinaigrette:

1 tablespoon extra-virgin olive oil
1 teaspoon balsamic vinegar
Assorted fresh herbs (such as thyme and chervil)
salt and freshly ground black pepper

Obviously I didn’t even bother with this as I gave up halfway through step 1. But, should you feel energetic and have at least two hours to spare, the proper recipe follows:

To make the piperade, preheat oven to 450 degrees. Line a baking sheet with foil. Place pepper halves on the baking sheet, cut side down. Roast until the skins loosen, about 15 minutes. Remove the peppers from the oven and let rest until cool enough to handle. Reduce the oven temperature to 275 degrees.

Peel the peppers and discard the skins. Finely chop the peppers; set aside.

In medium skillet over low heat, combine oil, garlic and onion and saute until very soft but not browned, about 8 minutes.

Add the tomatoes, their juices, thyme, parsley and bay leaf. Bring to a simmer over low heat and cook until very soft and little liquid remains, about 10 minutes. Do not brown.

Add the peppers and simmer to soften them. Discard the herbs, then season to taste with salt. Reserve a tablespoon of the mixture, then spread the remainder over the bottom of an 8-inch oven-proof skillet.

To prepare the vegetables, you will arrange the sliced zucchini, eggplant, squash and tomatoes over the piperade in the skillet.

Begin by arranging 8 alternating slices of vegetables down the center, overlapping them so that 1/4 inch of each slice is exposed. This will be the center of the spiral. Around the center strip, overlap the vegetables in a close spiral that lets slices mound slightly toward center. All vegetables may not be needed. Set aside.

In a small bowl, mix the garlic, oil and thyme, then season with salt and pepper to taste. Sprinkle this over vegetables.

Cover the skillet with foil and crimp edges to seal well. Bake until the vegetables are tender when tested with a paring knife, about 2 hours. Uncover and bake for another 30 minutes. (Lightly cover with foil if it starts to brown.)

If there is excess liquid in pan, place it over medium heat on stove until reduced. (At this point it may be cooled, covered and refrigerated for up to 2 days. Serve cold or reheat in 350-degree oven until warm.)

To make the vinaigrette, in a small bowl whisk together the reserved piperade, oil, vinegar, herbs, and salt and pepper to taste.

To serve, heat the broiler and place skillet under it until lightly browned. Slice in quarters and lift very carefully onto plate with an offset spatula. Turn spatula 90 degrees as you set the food down, gently fanning the food into fan shape. Drizzle the vinaigrette around plate. Serves 4.

Fifteen minutes or it’s free: DIY Debonair’s sub

Fifteen minutes or it’s free: DIY Debonair’s sub

While it’s important to embrace your new surroundings when moving to a new country, what’s really helped keep me sane (okay, maybe not SANE, but it’s at least kept me from rocking myself to sleep in a corner while I click my heels and whimper “There’s no place like home. There’s no place like home.”) is being able to enjoy little bits of said home as often as is practically possible. Food makes me very happy, so how much better is food that also triggers fond memories and temporarily creates the illusion that if you yanked back your curtains you’d be staring at your own front yard, even if just for a few minutes?

I’m not big on Debonairs pizza (sorry tuxedo’d dudes!). I like my pizza like I like my catwalk models – thin, flaky and smelling faintly of smoke. But if there’s one menu item of theirs I crave on a regular basis it’s their Club Sub. It hits all the right spots and here, in particular, it reminds me of happy times back home with good company. This easy dinner is whipped up in a quarter of an hour. Just save a bit of Marinara sauce the next time you make and freeze it in portions (ice cube trays work great!) or buy a bottle of ready-made.

DIY Debonair’s sub

(Serves 2)

Ingredients

1 large or 2 medium sized baguettes

2 chicken breasts, cooked, cooled and diced into 1cm cubes

150g ham*, diced into 1cm cubes

4 tablespoons of mayo (or to taste), lightly seasoned

125ml Marinara sauce (if you don’t have, just use 2 tablespoons of tomato paste)

1 cup grated cheese (mozzarella is best, but not always easy to find here)

Preheat your grill. Combine the chicken, ham and mayo in a bowl. Slice the baguette in half lengthways and toast lightly under the grill. Divide the Marinara equally between the two slices and smear evenly over each half. Top with the meat mixture, sprinkle cheese over the top and grill until bubbly.

* Eating meat products in China is a bit of a culinary Russian roulette. Not so much because you’re not always sure whether the animal you’re eating died in a sustainable and humane way (probably not) , but because the Chinese tend to eat a lot of sickeningly sweet meat. Few people can forget their first time biting into a piece of bakkwa when they were expecting biltong. It’s akin to finding your dad putting presents under the Christmas tree in his sleep shorts when you were expecting Santa. But the Yurun range of pork products is actually pretty good. Their barbequed pork is slightly sweet, but only in a general BBQ sauce kind of way and can be substituted for ham and they even make a passable banger!

Cocoa Bean and Vanilla Biscuits

Cocoa Bean and Vanilla Biscuits

People have been commenting a lot on my lovely personality of late. It’s like they feel they need to say SOMETHING nice somewhere in the conversation. Is this because I am, in fact, a twinkly beacon of light in the gloom? No. It is not. It is because I have gotten pleasantly plump. I mean really, I cry at the drop of a hat, go into a complete sorry-for-myself sulk whenever I have to say goodbye to another pet / friend / family member / sentimental belonging and sit for hours, not focusing on the conversation around me because I’m quietly doubting whether I have done this right or made the best decision there. So I know that everyone’s sudden admiration for my personality is not because my leaving has gotten them thinking about what they will miss about me. It’s because they don’t know how to tell me that my jeans are rather snug. If you compliment someone on a personal trait and ignore the increasing girth of their waistline, it cannot be empirically proven that you are, in fact, lying through your teeth.

I adapted this recipe from a Women’s Health magazine (July 2010) to use up some of all the lovely goodies I have to leave behind now. The Cocoa beans add a subtle bitter chocolate taste and have such a beautiful fragrance that you constantly want to take a whiff of the packet like someone with a glue sniffing problem. As it was from a Women’s Health magazine I obviously also had to add a smidgen more of this and that to get it more to my liking. These biscuits are designed to improve your personality and not your waistline.

Cocoa Bean and Vanilla Biscuits

Author: www.twosuitcasesandatinpot.com

Recipe type: Baking

Serves: 25 – 30

Ingredients

  • 200g butter, cubed
  • 100g icing sugar, sifted
  • 1 egg
  • 1 level teaspoon vanilla seeds (or 5ml extract)
  • 250g cake flour, sifted
  • 2 heaped tablespoons freshly ground cocoa beans
  • 2 or 3 grinds of coarse salt

Method

  1. Beat the butter in a bowl with an electric mixer until pale and creamy.
  2. Add the sugar, egg and vanilla and mix until combined.
  3. Add the flour, salt and beans and continue mixing until the dough just comes together. At all times, try to keep the dough as cool as possible and don’t over mix. Wrap in clingfilm and leave in the fridge for half an hour.
  4. Preheat the oven to 180˚C. On a floured surface, roll out the dough to about 4mm thick and press out the shape of your choice. Or just roll into walnut sized balls and flatten.
  5. Place on a prepared baking tray and bake for 8 to 10 minutes until lightly golden.

Notes

* You could use your favourite cookie or shortbread recipe and just chuck in the cocoa beans.

Creamy Sausage Stuffed Mushrooms

Creamy Sausage Stuffed Mushrooms

I must confess, I’ve been shoving it in. Food that is. When my husband ecstatically declared after a foray to the mall near our soon to be new home in China that he “Could buy cheese and ham!” I started going into panic mode. He was getting excited about cheese and ham? What does this mean for the foodie in me?? I have visions of living in a foreign country for years, deprived of a lamb chop. Of months dragging by with not an oozing wedge of Camembert to be seen. Of days spent pining for a piece of bread that contains less sugar than the average Checkers Sunday Morning Cream Cake Special. So I’m getting it in while the getting is good. And even if it’s all my favourite stuff, a surprising number of these dishes really could not be included here. (Like Royco’s Dijon Chicken with homemade chips and All Gold tomato sauce. It is my secret shame that a packaged pronto dish would feature on my list of last meals.) But these really should be. These moreish little mushroom morsels are hugely popular and disappear in a flash so make loads of them! It has been adapted from a recipe I saw in the Huffington Post one year when they featured the best snacks for the Superbowl. I don’t know anything about the original conceiver of this dish. All I know is that her name is Adriene. Thank you Adriene!

Creamy cheesy sausage stuffed mushrooms

Serves: Well, it could serve just me. But probably 6 if I share.

Creamy Sausage Stuffed Mushrooms

Hands-on time

15 mins

Cook time

45 mins

Total time

1 hour

Author: www.twosuitcasesandatinpot.com

Recipe type: Snack

Serves: 6

Ingredients

  • 2 punnets of small brown mushrooms (or 4 very large ones)
  • 6 smoked sausages* (anything will do, as long as the texture is fairly chunky)
  • 3 heaped tablespoons plain cream cheese
  • 1 large onion, minced
  • 3 garlic cloves, minced
  • 1 cup grated cheese* (preferably something like a Gruyere that melts nicely)
  • 1T tomato paste
  • a bit of fresh oregano, finely chopped
  • 3 T olive oil
  • 3 T balsamic vinegar
  • salt & pepper

Method

  1. Wipe mushrooms clean with a damp cloth and pull out the stems and discard. Toss the mushrooms with the olive oil, balsamic vinegar, salt and pepper. Spread out on a baking dish and bake in a pre-heated oven at 180 degrees C for 20 minutes. Set aside and cool.
  2. Slit the sausage and remove the filling from the casings. Crumble in a dry heated pan and saute until golden brown. Break up into small pieces while it is cooking. Remove from the pan, reserving the pan fats and juices and aside to cool.
  3. Add the onions to the pan, with a bit more oil if neccesary. Cook slowly until caramelized (about 20 minutes), deglazing the pan with a little water if you need to. Then add the garlic and tomato paste and cook for another minute.
  4. Put the cooked sausage, onions and garlic, cream cheese, salt & pepper, herbs and the grated cheese in a bowl and mix well with your hands.
  5. Line up your mushrooms in a greased baking dish with the core side facing up. Stuff each mushroom with a generous portion of the creamy sausage mixture.
  6. Now put the baking dish in a pre-heated oven at 180 degrees for roughly 20 minutes or until they are golden brown. (This dish can be made up to 3 days ahead of time and put in the cooler until you are ready to put them in the oven.)
  7. Serve and stand back so you don’t lose a finger. Blink and they’re gone.

Notes

* You can substitute any good bangers for the sausage, but then be sure to use a smoked cheddar cheese.

Three Cheese Phyllo Chicken Parcels

Three Cheese Phyllo Chicken Parcels
Three cheese chicken phyllo parcels

It’s not easy being posh, especially for someone like me who will literally spend an entire weekend in my PJ’s, hair unbrushed, face undone and drinking juice straight from the carton when my husband is away. Whether I’m trying to get my hair under control or serve up a fancy feast, being posh requires time I don’t have, effort I cannot be bothered with and a plethora of tools probably gathering dust in a cupboard somewhere. Not so if you make these easy little chicken parcels. Minimum effort, relatively high posh factor (we’re not talking Fat Duck here okay? But they’re at least one step up from mac & cheese). Then again, you can wrap a bit of old shoe in some phyllo pastry and people will ooh and aah when you serve it.

Three Cheese Phyllo Chicken Parcels

Hands-on time

20 mins

Cook time

60 mins

Total time

1 hour 20 mins

Author: www.twosuitcasesandatinpot.com

Recipe type: Main

Serves: 4

Ingredients

  • 4 skinless and deboned chicken breasts
  • 1 cup cheese (use a mixture of feta, mozzarella and a bit of cream cheese)
  • basil pesto
  • 1kg tomatoes, cut into wedges
  • 125ml cream
  • phyllo pastry
  • butter

Method

  1. Switch your oven to grill. Cut the chicken into strips. I find that cutting across the grain and holding your knife at a 45 degree angle makes for the most tender pieces. Season, place in a baking dish in a single layer and grill until almost done, but still slightly pink in the middle.
  2. Turn the oven to 180˚C, chuck the chicken on a plate to cool slightly, and place the tomatoes in the baking dish. Saves on washing up. Drizzle with a little olive oil, balsamic vinegar, salt, pepper and a pinch of sugar. Roast for 30 minutes.
  3. Remove your thawed phyllo and keep under a moist kitchen towel until you’re done working with it. Cut three sheets of your pastry into 20 x 20cm squares and place on top of each other, brushing each layer with butter as you go (For the love of God, don’t use cooking spray or margarine. Life is too short). Now, place a few pieces of chicken in the middle of your pastry. Spoon a quarter of the cheese mixture on top, place 2 wedges of tomato on top of that and finish your little tower with a teaspoon of basil pesto. Gather the phyllo together around the chicken and make a little parcel. The butter will help it all stay in place if you just sort of scrunch it together. Bake at 180˚C until golden brown.
  4. To serve, blend the remaining tomatoes, strain trough a sieve and heat. In a separate pot, add about 2 tablespoons of the pesto to the cream and reduce until slightly thickened. Serve the parcels with the sauces and a few crispy potato wedges.

Jethro Tart

Jethro Tart

We all have one of those recipes. A dish with a list of ingredients so extravagant that the only time you would ever actually contemplate making it is when the queen comes to visit. Actually not even the queen. Simon Baker maybe, but nothing less. Jamie Oliver‘s Jethro tart is one of those recipes. 255 grams of pine nuts. With the price we pay for pine nuts it’s utter madness! Madness I tell you! And so this recipe was destined to just lie there, untasted, glaring at me condescendingly every time I page past it in search of a dessert idea for a dinner party. Until I happened upon a ginormous bag of pine nuts for really cheap in the land where there are more pines than people. (I proceeded to stuff myself so full of the delicious little kernels over the weeks following my purchase that I actually developed Pine Nut Syndrome – an annoying but utterly fascinating side effect from pigging out on them). But don’t let that put you off. These tarts are lovely and completely harmless if consumed in moderation. If you don’t have a Costco around the corner (or Simon isn’t coming for a visit), substitute with any nuts you please. I made individual ones instead of one big one.

Jethro tart

Jethro Tart

Hands-on time

20 mins

Cook time

35 mins

Total time

55 mins

Author: Jamie Oliver

Cuisine: Dessert

Serves: 8

Ingredients

  • Prep time: 20 minutes plus about 2 and a half hours for refrigerating and baking
  • Ingredients
  • 255g pine nuts
  • 255g butter
  • 255g castor sugar
  • 3 large eggs
  • 4 tablespoons honey
  • 115g plain flour
  • a pinch of salt
  • For the Pastry
  • 115g butter
  • 100g icing sugar
  • a pinch of salt
  • 225g plain flour
  • 2 egg yolks
  • 2 tablespoons cold water

Method

  1. Cream together the butter, sugar and salt then rub or pulse in the flour and egg yolks. When the mixture has come together, looking like coarse breadcrumbs, add the water. Gently pat together to form a small ball of dough. Wrap and leave to rest for an hour.
  2. Carefully cut thin slices of your pastry (or you can roll out if you prefer) and place in and around the bottom and sides of a 30cm tin. Push the pastry together and level out and tidy up the sides. Cover and leave to rest in the freezer for about 1 hour.
  3. Preheat your oven to 180˚C, and bake the pastry for around 15 minutes until lightly golden. Keep an eye on the pastry if you are making smaller tartlets instead as it might require a shorter cooking time.There is no need to blind bake. Reduce the oven temperature to 170˚C.
  4. While the pastry is in the oven, toast the pine nuts under the grill. (OK, now you need to listen. REALLY listen. You’re going to read this warning and think it won’t happen to you. You’ll think you’re invincible and you’ve got it covered. But you don’t. They will burn. It has happened to all of us. The nuts will go from a gorgeous Gisele Bündchen caramel to black in a matter of seconds. Don’t turn your back on them! Seriously. if you’re blasé about this it is going to happen to you too. You have been warned.) Using a spatula or a food processor whip the butter and sugar until light and fluffy. Stir in the pine nuts, add the eggs one at a time, then fold in the honey, flour and salt. Spoon into the tart shell and bake for 30-35 minutes.

Satay & Sosaties

Satay & Sosaties

It was the beurre blanc sauce that did it in the end. Sitting in The Cactus Club Cafe in Vancouver, swirling the last morsel of butternut squash ravioli and perfectly grilled prawn through the delicate, buttery emulsion I was suddenly miffed. Why do we not get food like this at home? I mean really, how hard can it be?? Butter? Check. Prawns? Check. Squash? Check. We’re not talking eye of newt or toe of dragon here! You can buy everything at your nearest supermarket for crying in a bucket! Okay, it wasn’t cheap. But then nothing is cheap when you’re buying with a few bruised and battered rands. But on my chicken index (closely related to the Big Mac index and, inexplicably, my scale of choice for comparing prices on this particular trip) this plate of gastronomic grub had only cost 1.2 chickens before tax and a tip. And we found the same thing everywhere. Both the food and service was exceptional. It didn’t really matter whether we were doing fine dining at C Restaurant or just having fish and chips at the first place we found in Qualicum Beach. So why is it so hard to get the same thing here? It’s not because we don’t have the talent in South Africa. You need only venture beyond the borders of Mossel Bay and Sedgefield to get generally good food and service. And a trip to any of our local markets will quickly dismiss any suggestion that it could be a lack of excellent, fresh produce. It’s the mentality of this town when it comes to all things foodie and the mentality of South Africans in general when it comes to demanding to get what you paid for. If The Cactus Club had to open a location in George they’d be gone within a year. And a Wimpy would probably spring up in its place.

Don’t get me wrong. I love Wimpy. A Wimpy coffee and a breakfast is the highlight of any rainbow blooded South African’s every road trip. But there is a time and a place. And Saturday morning – so close to the Wild Oats Farmers’ Market in Sedgefield that you could brain a stall holder with a well aimed Mega coffee – is not the place. And yet, there they sit in their droves: Garden Routers who would rather eat yet another Wimpy breakfast than have anything as outlandish as a crispy potato rösti topped with salmon, a poached egg and real Hollandaise sauce from the market. For the same price. And THAT is why we don’t get food like we did in Canada, in George. Because we don’t ask for it. We are happy to pay for mediocre food and atrocious service, clandestinely murmuring our dissatisfaction to our fellow diners, but never daring to raise our objections with the owners of the establishment.

We need to be more discerning. More demanding. If you’re going to pay a ten percent tip to your waitron anyway, shouldn’t they at least clear your plates in a timely fashion and fill your wine glass before it is empty? If you’re going to fork out money for a plate of calamari, shouldn’t it at least be a good plate of calamari? There is a restaurant in town (that shall remain nameless) that was always a favourite of ours for really, really good seafood. But they’ve been, well, total crap of late. We tried three times and the outcome was the same. And while we will never go back, it is still jam packed when you drive past there, because the clientele just doesn’t seem to care. So how will they ever get better? They’ll just keep turning out the same plates of mediocre food to an undemanding audience, because they CAN.

I understand that you know what a Wimpy breakfast tastes like, and that that is why you will keep going back there. I get it. But there are 5 Wimpy’s in George alone. Five! Yet restaurants like Margot’s, Tarragon’s and Sunsutra didn’t make it. No one wants to try a lamb burger with chermoula when they know exactly what a Spur burger tastes like. I have seen local menu’s change from iced berries with hot white chocolate to ice cream with hot chocolate sauce (oh, the *yawn* excitement) and  the concomitant extinction of that little spark in the restaurateurs eyes. And when you look again, they’re gone. So next time you’re in the area, why not stop at the Wild Oats market and have a fresh roll topped with fluffy, creamy scrambled eggs and perfectly crisp bacon instead of your usual? Just once. Support the brilliant food stalls at the Outeniqua Farmers’ Market  on a Saturday. Live totally on the edge and have a croquette or Thai chicken curry for lunch. Have dinner at The Old Townhouse for a change and try one of their biltong, feta and peppadew springrolls or one of Dario’s weekly specials using the freshest seasonal ingredients at La Locanda. Surely fresh asparagus with parmesan cream sounds more appealing than yet another salad bar? It’s not that scary! Try it. You’ll probably like it.

Anyhoo. On to the cooking.

We might not be discerning when it comes to restaurants, but if there’s one thing we know here, it’s braaiing. Real braaiing. On wood and everything. We were only gone for four weeks, but we suffered some major smoke withdrawal! So in the spirit of adventure, why not try these chicken satays the next time you light the fire. If you’re a true Georgian, the fish sauce will scare you. But give it a bash anyway! If you don’t like it, you can just have sosaties again tomorrow. And you know Wimpy will always be there with an old faithful standby.

See more Thai recipes from Darlene Schmidt here.

Satay & Sosaties

Hands-on time

25 mins

Cook time

15 mins

Total time

40 mins

Author: Darlene Schmidt via www.twosuitcasesandatinpot.com

Recipe type: Main

Cuisine: Thai

Serves: 4

Ingredients

  • 12 skinless chicken thighs, or 6 chicken breasts cut into thin strips or 2cm cubes
  • package wooden skewers – soak in water for an hour or so before use
  • ¼ cup minced lemongrass (If you don’t have one of these in your garden, plant one as soon as possible! They grow with no attention whatsoever and make a fabulous addition to iced tea, sparkling wine and of course all things Thai.)
  • 1 small onion, sliced
  • 3 cloves garlic
  • 1-2 fresh red chillies, sliced or to taste (I omit this cause I’m a sissy)
  • 1 thumb-size piece ginger, thinly sliced
  • ½ tsp. dried turmeric
  • 2 Tbsp. ground coriander
  • 2 tsp. cumin
  • 3 Tbsp. dark soy sauce
  • 4 Tbsp. fish sauce (Essential! Don’t leave it out.)
  • 5-6 Tbsp. brown sugar
  • 2 Tbsp. vegetable oil

Method

  1. Place all marinade ingredients in a food processor or blend with a stick blender until smooth. Now sniff it. Seriously. It smells sooooo good! And sommer dunk your finger in there too for a taste.
  2. Place the chicken in a bowl, pour the marinade over the meat and stir well to combine. Allow at least 1 hour or longer for marinating (up to 24 hours).
  3. When ready to cook, thread meat onto the skewers, leaving the bottom quarter of the skewer open for gripping. Grill the satay on the braai or on a griddle pan on the stove. They should take about 15 minutes.
  4. Serve with rice and satay peanut dipping sauce. I am yet to find one that conjures memories of Thailand, but this one, also by Darlene Schmidt, is pretty good.

Not Just Any Pizza Bread

Not Just Any Pizza Bread

I love this recipe for so many reasons. It’s easy, it’s flexible, it’s virtually impossible to mess up. I recommended it to a friend for her son’s birthday party recently and she absolutely loved it. So if a mother of three boys under three thinks it’s easy to make, then pretty much anyone can do it.

Not Just Any Pizza Bread

Author: www.twosuitcasesandatinpot.com

Recipe type: Breads & sides

Ingredients

  • Bread dough (buy a bag from just about any supermarket bakery).
  • Marinara sauce (either buy ready made in a jar, or just blend a tin of Ishibo (tomato and onion mix everywhere else in the world) with a clove of garlic, a teaspoon of dried origano and salt and pepper).
  • Basil pesto (and / or bacon, feta, sundried tomatoes, chorizo, caramelised onions or whatever else blows your hair back.).
  • A cup of grated cheese.
  • 250ml cream, seasoned with salt and pepper

Method

  1. On a floured surface, roll out the bread dough to roughly 8mm thick.
  2. Smear the marinara sauce over the dough, stopping about 2cm from the edge. If this is starting to sound suspiciously like a pizza, then you’re doing it right.
  3. Add the rest of your toppings and pour over the grated cheese.
  4. Starting at one end, roll the dough into a sausage. Cut into 1.5cm thick slices and arrange the spirals in a single layer in a baking dish.
  5. At this point you can allow it to rise, or you can go straight to baking it. Pour the cream over the bread and bake in a 180°C oven for about 35 minutes.
Pizza bread

Bacon & Blue Cheese Salad with Honey Mustard Dressing

Bacon & Blue Cheese Salad with Honey Mustard Dressing
Bacon & blue cheese salad

Yes, I know, this is a terrible photo. The rainbow assault from the colours in the table cloth completely overwhelms the food, which is supposed to be the star. The lines on the cloth are so skew that you’re probably clawing at your screen trying to straighten them. The proportions are wrong. It looks like a unicorn exploded all over the place. You can hardly tell what you’re eating. It’s just bad. But I need cheering up today and something about this photo is immensely cheering to me. And so is this salad (as are all salads that fatten you up faster than a jelly doughnut). The combination of the creamy Gorgonzola, the warm, salty bacon on the cool, crisp lettuce and the sweet, sharp dressing is so simple, but really, really delicious. It hits all the spots. Or at least, it hits all my spots. I was really happy with how the dressing came out – proof once again that pretty much everything on this planet tastes better with a dollop of mayo.

Bacon & Blue Cheese Salad with Honey Mustard Dressing

Hands-on time

15 mins

Cook time

10 mins

Total time

25 mins

Author: www.twosuitcasesandatinpot.com

Recipe type: Salad

Serves: 4

Ingredients

  • For the honey mustard dressing:
  • 80ml sunflower oil
  • 60ml white wine vinegar
  • 15ml Dijon Mustard
  • 40ml honey
  • 15ml Japanese mayo (Or any good stuff. You don’t want the sharp eggy-ness of a cheap one here.)
  • 2ml salt
  • For the salad:
  • 300g lettuce
  • 250g bacon, fried and chopped
  • 100g Gorgonzola or cremezola (preferably something mild and creamy and not too sharp)
  • One avo, cut into cubes
  • 2 large tomatoes, cut into wedges
  • 3 spring onions, thinly sliced

Method

  1. Whisk all the ingredients for the dressing together and set aside.
  2. Toss all the ingredients for the salad together and serve with the dressing. For a more substantial meal, just bung the whole lot in a tortilla wrap.

Oxtail Ragu Stuffed Pasta Shells in Parmesan Cream

Oxtail Ragu Stuffed Pasta Shells in Parmesan Cream

My uncle, who is an Afrikaner and therefore really knows his meat, always taught me that good oxtail needs a lot of onion. You could tell he knew about meat, because at our family braais on Sundays he wore short shorts and navy blue socks pulled up to his knees. This, along with the squeegee bottle used solely for the dousing of a wayward flame on the braai is, as far as I know, the actual kit handed out to all graduates of whatever meat connoisseur academy these people graduate from. So this might seem like a lot of onion to use in one recipe. It is. But trust him. This is one of those recipes born from a need to find a use for a bag of huge pasta shells and a bit of Parmesan that’s being sitting in the freezer for 6 months. For best results, cook the ragu a day in advance. This makes about two portions of meat. Freeze half and use in anything that requires a Bolognaise sauce.

Oxtail Ragu Stuffed Pasta Shells in Parmesan Cream

Oxtail Ragu Stuffed Pasta Shells in Parmesan Cream

Hands-on time

40 mins

Cook time

4 hours

Total time

4 hours 40 mins

Author: www.twosuitcasesandatinpot.com

Recipe type: Main

Serves: 4

Ingredients

  • For the ragu:
  • Roughly 1kg oxtail
  • 800g minced beef
  • 4 large onions, chopped
  • 5ml coriander (the brown ground up stuff, not the green, chopped stuff. 5ml of coriander leaves would be a total waste of time.)
  • 5ml cumin
  • 3 cloves garlic, crushed
  • 1 tin chopped tomatoes
  • 250ml red wine
  • 250ml beef stock
  • 1 bay leaf
  • 10ml dried origanum (you’re going to boil this for hours, so it’s really not worth the effort of washing a mezzaluna for the fresh stuff)
  • 50g tomato paste
  • 1 tablespoon of plum jam (or plub jab for those with sinus problems)
  • Seasoning
  • For the Parmesan Cream:
  • 2 tablespoons butter
  • 2 level tablespoons flour
  • 3ml coriander
  • 400ml milk
  • 250ml cream
  • 50g Parmesan, grated
  • Seasoning

Method

  1. In a large, cast iron pot, brown the oxtail.
  2. Scoop the oxtail into a dish and add the mince to the pot to brown.
  3. Scoop the mince out and add the onion to the pot. Sauté over a low heat until they’re slightly caramelised. It shouldn’t be necessary to add oil as the meat should give off enough fat.
  4. Add the garlic and fry for a further 2 minutes.
  5. Add the cumin and coriander, stir through and cook for a further minute or two.
  6. Add the meat and any juices that have collected to the pot.
  7. Add the tomatoes, stock, wine, bay leaf, herbs and tomato paste. Bring to the boil, then turn the heat down and allow to simmer for 4 hours, stirring occasionally.
  8. Remove the oxtail, shred the meat from the bones and return to the pot. (The meat, not the bones. Give the bones to the dogs. After you’ve nibbled on them – it’s the best bit really).
  9. At this point, if there is too much liquid in the sauce, turn the heat up and reduce. You want a fair amount of liquid, but not too much. Sort of like the length of a piece of string.
  10. Adjust the seasoning. If the tomatoes were a bit too acidic, or the onions haven’t added enough sweetness, add a tablespoon of plum jam.
  11. For the Parmesan Cream:
  12. Melt the butter, add the flour and stir. Cook for 2 minutes. Add the coriander and cook for a further minute.
  13. Add the milk and stir till smooth. I heat my milk before adding it. Makes it easier to get a smooth sauce. If at this point you have made the type of lumpy white sauce that would get you a D in Home Ec. then don’t panic. Just take a whisk to it and the lumps will come out.
  14. Add the cream and stir in the Parmesan cheese.
  15. Adjust the seasoning. This should be a fairly thin sauce as the pasta is going to slurp up a lot of the liquid.
  16. To assemble:
  17. Preheat the oven to 180˚C.
  18. Pour the Parmesan cream into a dish just large enough to accommodate all the shells cheek to jowl. You’ll need around 28 of the large Delverde Conchiglioni No.240 shells. (Available in George at Checkers, York Street.)
  19. Place spoons full of the meat sauce in the shells and arrange in the dish on the sauce. The shells must be completely filled – if you leave a gap at the top it won’t cook through.
  20. Cover with foil and bake in the oven for 40 minutes. Check after the first twenty minutes to ensure that all the shells are covered with sauce. If any bits are sticking out, either push them back under the sauce or add a little more milk if it’s looking too dry.
  21. Remove from the oven, allow to stand, covered, for 5 minutes and serve.
Oxtail ragu stuffed pasta shells

Breakfast Flapjacks

Breakfast Flapjacks

Like tea in a fine china cup, cheese when it’s grated and chocolate on a Tuesday when you started your diet on Monday, food just tastes better when it’s shared. I feel a little cheated when we go out for dinner and I don’t have at least two bites of my husband’s food (Tip: This handy habit also decreases your chances of getting order envy). So when we were asked last Sunday to cater for breakfast at the beach, I decided to haul out my Grandad’s old Mongolian Grill and get everyone to cook their own. I used to love the evenings when we did stirfry at Oupa’s house on this splendid contraption. I would scoop up spoons full of bacon, beef and chicken and top it all with two julienned carrots and a bean sprout and declare that I was eating my veggies. Not being Chinese, no one ever got the actual stir fry just right, but that didn’t seem to matter. There was just something about the “Check hers out!” and “Bru, I don’t think it’s supposed look like that!” that somehow made the complete lack of authentic taste of the food irrelevant. It didn’t really matter what they ate, everyone just loved the competition. I was sure the same could be achieved with some batter and a bit of bacon and I was not disappointed. There will always be that one guy who puts the cheese in too early. “Bru, I don’t think it’s supposed to look like that!”.

Mongolian BBQ breakfast

Breakfast Flapjacks

Breakfast has never been this much fun!

Author: www.twosuitcasesandatinpot.com

Recipe type: Breakfast

Serves: 4 – 6 (depending on the chefs)

Ingredients

  • 2 cups cake flour
  • 2 eggs
  • 1 tablespoon sugar
  • 2 tablespoons melted butter
  • 4 teaspoons baking powder
  • ½ teaspoon salt
  • 1 cup milk
  • Cooking oil
  • 2 packets bacon, chopped
  • 1 punnet brown mushrooms, chopped
  • 2 cups cheese, grated
  • I bunch spring onions, sliced
  • Any other filling that takes your fancy (Feta and sundried tomatoes and a few fresh herbs would add a nice Mediterranean twist. Ooh, and salmon, cream cheese and caviar if you want to get all fancy!)
  • Eggs
  • Sauce to serve. We used a creamy mushroom, but Hollandaise would be fantastic!

Method

  1. For the flapjack batter, whisk the eggs and sugar together.
  2. Add ½ cup of milk and butter to the egg mixture.
  3. Sift the flour, baking powder and salt together and add to the egg mixture.
  4. Add the remaining milk and mix to a smooth batter.
  5. If necessary, add a little water to the batter if it’s too thick.
  6. Now oil and fire up the grill. To cook the flapjacks, each person fries whatever filling combination they like. Once cooked, you can flatten the ingredients on the grill into more or less a flat, round shape and then pour the batter over, but I found the best way is to scoop the cooked ingredients into a bowl, add the batter and cheese and then scoop spoonfuls back onto the hot griddle. When bubbles start forming on the top, flip over, cook the other side for a few moments and serve with the sauce and a fried egg.

Honeyed Pears and Walnuts with Port & Gorgonzola

Honeyed Pears and Walnuts with Port & Gorgonzola
Honeyed pears with port & gorgonzola

If you’re looking for an easy pre-dinner drinks snack then this dish is a winner! Sit near it and you’ll look like the most popular person at the party.

Honeyed Pears and Walnuts with Port & Gorgonzola

Hands-on time

10 mins

Cook time

20 mins

Total time

30 mins

Author: www.twosuitcasesandatinpot.com

Recipe type: Snack

Serves: 6

Ingredients

  • 5 firm pears – cored, peeled and diced into 1cm cubes
  • 2 tablespoons butter
  • 3 heaped tablespoons honey
  • 125ml walnuts, chopped
  • 125ml Port (Hanepoot or Jerepico will also get the job done, but the Port makes it really pretty)
  • 125g or more of any blue veined cheese
  • Melba toast or crackers for serving or puff pastry if you have the energy

Method

  1. In a saucepan, heat the butter over a moderately high heat. Add the pears and honey and fry until golden and sticky. Add the Port and boil until reduced to a syrup. Add the walnuts, heat through and allow to cool. Once at room temperature, crumble in the blue cheese and stir until just combined. Now you can do one of three things. Four if you count munching the whole lot straight from the pan before it can even get to the table.
  2. Serve at room temperature with melba toast or crackers.
  3. Warm in a 180˚C oven until the cheese just starts to melt and serve with melba toast or crackers.
  4. Or, my personal favourite, cut puff pastry into squares (roughly – and I say roughly because I never seem to be able to cut two squares to the same size – 5 x 5cm squares). Score the pastry square all the way around about 5mm from the edge. This is so that the edge will puff up and contain the filling when baking, so don’t be tempted to skip this step. The time you save skipping this will be spent trying to scrub the burnt filling off your prized oven pan. Spoon teaspoons full of the mix onto the squares and bake at 200˚C until golden (around 20 minutes). When you do it this way the pear mixture goes all caramel and gooey on the edges. Very moreish!

Chicken Liver Parfait

Chicken Liver Parfait

Chicken Liver Parfait. Big whoop, I hear you say as you start navigating away from the page. But trust me, if you are in any way partial to chicken liver (and even if you’re not, but you’re easily persuaded to partake in activities you know you shouldn’t) try this! It is slightly more finicky than bog standard pâté, but it’s totally worth the effort of cleaning the icky sieve afterwards. It’s like the conscious (and poor) person’s foie gras. Just please don’t try to fry it. And whatever you do, don’t attempt to make it directly after watching an episode of American Horror Story like I did, cause the whole process is a bit gross. You’ve been warned. Also, you might want to befriend a cardiothoracic surgeon and keep him / her on hand before tucking in. This is not diet food!

Chicken Liver Parfait

From Food & Home Entertaining

Chicken Liver Parfait

Hands-on time

20 mins

Cook time

45 mins

Total time

1 hour 5 mins

Author: www.twosuitcasesandatinpot.com

Serves: 8

Ingredients

  • 500g chicken livers
  • 500ml milk
  • 2 garlic cloves
  • 2 shallots or small onions, chopped
  • 6 sprigs thyme, leaves only
  • 375ml port
  • 375ml sherry (not too sweet)
  • 500g butter, melted
  • 1 large egg yolk
  • Salt and pepper

Method

  1. NB. Ensure all your ingredients are at room temperature when mixing or they might curdle.
  2. Clean the livers and soak in the milk overnight to remove any bitterness.
  3. The next day, place garlic, shallots and thyme in a saucepan with the port and sherry. Simmer until reduced to a thick syrup and allow to cool.
  4. Preheat the oven to 150˚C.
  5. Rinse the livers and pat dry with a paper towel.
  6. In a food processor, blend the livers with the syrup reduction and slowly add the butter in a steady stream. Once it’s all incorporated, stir in the egg yolk. Don’t blend again, or the mixture might curdle. Pass the mixture through a fine sieve and season to taste. This is a bit tricky, cause you really don’t want to taste it at this point! I suggest cooking a teaspoon full in the microwave to check the seasoning.
  7. Pour into a terrine lined with plastic wrap. I just used a loaf tin, but this meant that the plastic melted where it came into direct contact with the metal. In retrospect this was a doff move.
  8. Place in a bain marie or oven tray with hot water halfway up the side of the dish. Bake for about 45 minutes. The centre should be at 68˚C (a knife stuck in the centre and placed on your lip should be hot, but not burn you. If it burns you you’ve overdone it and will now also require some Bactroban for that burn on top of having to dig out the frozen cheese puffs because you promised tonight’s hostess that you’d bring a snack to the party. I suggest you just sit down with a glass of wine before you start cleaning up that icky sieve.)
  9. Remove from the oven and allow to cool in the water. Chill in the refrigerator for at least 4 hours before serving. Don’t be tempted to prod it in any way!
  10. Unmould and serve thin slices with melba toast.

Roast Tomato and Garlic Soup with Bacon and Cheese Toasts

Roast Tomato and Garlic Soup with Bacon and Cheese Toasts

In a sheer fit of lunacy, I once decided to attempt one of Heston Blumenthal’s recipes. Chilli Con Carne to be exact. After three days of painstakingly weighing, chopping, roasting, simmering, straining and thrice cooking about a thousand rand’s worth of ingredients I had Chilli Con Carne that tasted like, well, Chilli Con Carne (and a pretty chilliless one at that – I was obviously a bit too timid). But while I no longer see the point of making my own beef stock when Nomu does an excellent job of it, I did learn one thing: How to extract maximum flavour from the humble tomato with minimum effort.

Tomato soup

Roast Tomato and Garlic Soup with Bacon and Cheese Toasts

Hands-on time

25 mins

Cook time

60 mins

Total time

1 hour 25 mins

Author: www.twosuitcasesandatinpot.com

Recipe type: Soup

Serves: 4

Ingredients

  • For the soup:
  • 1kg fresh tomatoes, cut into quarters (If you can find on the vine, retain the vine. If you can’t, consider tending a tomato plant in your garden for that purpose. Pretty much every garden has one growing somewhere thanks to birds indiscriminately pooping wherever they please.)
  • 1 garlic bulb, cloves peeled
  • 2 onions, cut into quarters
  • 50ml olive oil
  • 30ml balsamic vinegar
  • 15ml sugar
  • 20g tomato paste
  • 500ml vegetable stock
  • Seasoning
  • Basil pesto to serve
  • For the bacon and cheese toasts:
  • 4 to 6 Slices of bread (I used potbrood, but any fairly solid loaf will do)
  • 1 cup grated cheese
  • 250g bacon, fried and chopped
  • 3 heaped tablespoons cream cheese
  • 1 tablespoon fresh, chopped oregano
  • Seasoning

Method

  1. For the soup:
  2. Preheat the oven to 200˚C once you are ready with your tomatoes. Place the tomatoes in a colander over a baking dish and sprinkle liberally with Maldon salt. At least a tablespoon full. Allow to stand until a fair amount of juice has collected in the dish. Add the tomatoes to the dish with the onion, peeled garlic cloves, oil and vinegar. Roast at 200˚C for twenty minutes then turn the oven down to 160˚C and roast for a further 40 or so minutes. Once everything looks beautiful and sticky, you stop. Stir occasionally and keep an eye on the garlic because it tends to get a bit too toasty if left on the bottom for too long.
  3. At this point you can take everything, chuck the tomato vine in and refrigerate until you’re ready for the soup. Once you are ready, place the whole lot in a blender with the chicken stock and process till smooth. My husband likes things chunky (a lucky coincidence for me considering I’m ten kilo’s heavier than the day he married me), but if you like your soups smooth, you can pass it through a sieve at this point. Remember to scrape the bits that stick to the bottom of the sieve off – it helps to thicken the soup. Add the tomato paste and stir in the sugar if the tomatoes aren’t sweet enough.
  4. Heat through and serve with a basil pesto swirl and a dash of cream if you like.
  5. For the bacon and cheese toasts:
  6. Mix all the ingredients together. Place the bread slices under a grill and toast till toasty. Flip over and spread the cheese mixture on the untoasted side. Place back under the grill and bake until golden and bubbly. Cut into soldiers and serve with the soup.

Mayo Dip for Fish Cakes

Mayo Dip for Fish Cakes

Considering the abundance of recipes overflowing from my kitchen cupboard, one would think that I’d kick the year off with something a little more shoo-wow than fish cakes. Even if the recipe did promise they would be as good as your gran used to wish she could make. But there was something appealing about making a humble fish cake the way a chef would do it. So in true me style, I took this Master Class recipe, swore hand on heart I would follow it to the letter, and then promptly changed it to suit my new need-to-shrink-a-dress-size and need-to-clear-the-clutter-from-my-life resolutions. The fishcakes themselves were no great shakes so I haven’t even included them, but the sauce was yummy!

Mayo Dip for Fish Cakes
(Adapted from the January 2011 Food & Home Entertaining recipe by chef Jodi-Ann Pearton)

Mayo Dip for Fish Cakes

Author: www.twosuitcasesandatinpot.com

Recipe type: Condiment

Serves: 4

Ingredients

  • 75ml good quality mayonnaise (OK, I lie. The recipe said good quality mayo, but I had some Cross & Blackwell (sorry Cross & Blackwell) I needed to finish, so I used that and I actually really liked the sweet tartness it added to the sauce.)
  • 75ml cottage cheese and enough milk to get the consistency you like once the sauce is done
  • 15ml green peppercorns (A horrific incident with a day old pepper steak pie in my student days means that I steer way clear of pepper, so I omitted this.)
  • 15ml creamed horseradish (fresh out, so substituted wasabi)
  • 15ml Dijon mustard
  • ¼ onion, very finely chopped
  • 5ml flat leaf parsley
  • 2,5ml lemon zest

Method

  1. Chuck all the ingredients in a blender and whizz till smooth or just stir together if you prefer something a little chunkier. Serve with fish cakes or just about anything that could do with a creamy dipping sauce.